Published Book on Amazon
| All of IOT Starting with the Latest Raspberry Pi from Beginner to Advanced – Volume 1 | |
| All of IOT Starting with the Latest Raspberry Pi from Beginner to Advanced – Volume 2 |
출판된 한글판 도서
| 최신 라즈베리파이(Raspberry Pi)로 시작하는 사물인터넷(IOT)의 모든 것 – 초보에서 고급까지 (상) | |
| 최신 라즈베리파이(Raspberry Pi)로 시작하는 사물인터넷(IOT)의 모든 것 – 초보에서 고급까지 (하) |
Original Book Contents
15.1.4 Review of Special Device
15.1.4.1 Booting SD Card
The default Debian distribution consists of two partitions on the SD card. The first partition is 75 MB in VFAT format, a format for Microsoft's removable devices. It has the files needed to configure Raspberry Pi and files to load Linux itself, and is mounted as "/boot" after booting. The second partition is much larger in the EXT4 format, the default format for fast access and data reliability in Linux. All other programs, user-installed programs, and user data are all stored here. It occupies most of the SD card.
However, when using the <NOOBS> utility, the partition of the SD card is much different from the above one. When you first format the SD card into FAT format and copy the <NOOBS> utility file, there is only one partition that occupies the entire space of the SD card. However, in the process of installing operating system, it creates multiple partitions on the SD card for the purpose of controlling the installation and recovery process and managing the installed operating system. Please refer to the following URL for more details information.
■ https://github.com/raspberrypi/noobs/wiki/NOOBS-partitioning-explained
The following is an example of partition and device file of booting SD card when installing Raspbian operating system using <NOOBS> Utility. Please note that the configuration of the partition may differ depending on the configuration of the operating system installed.
■ block device mmcblk0p1 -- Labe "RECOVERY" -- NOOBS Utility file
■ block device mmcblk0p2 -- Any logical partitions
■ block device mmcblk0p5 -- Labe "SETTINGS" -- NOOBS settings
■ block device mmcblk0p6 -- Labe "boot" -- Raspbian boot files
■ block device mmcblk0p7 -- Labe "root0" -- Raspbian root filesystem
15.1.4.2 USB Storage Device and Mount
If the Raspberry Pi system logs in to the Desktop GUI automatically or manually using LXDE from the console, the USB storage device is automatically mounted. However, when connecting via the Desktop window method remotely using the VNC program, the USB storage device is not automatically mounted. Also, while connected to the Desktop GUI in any case of console connection or remote connection, if the USB storage device is connected for the first time the system will check whether or not to mount it. If you instructs mount here, it is automatically mounted.
However, booting to the Terminal connection in the console does not automatically mount it. If you want to use a USB storage device even in console Terminal mode, you have to mount it manually or register it in "/etc/fstab" file to mount it automatically.
For reference, note that unlike previous versions of Linux, the "/etc/fstab" file no longer maintains removable storage device information. These removable storage devices are automatically searched by a system called a hardware abstraction layer (HAL), and then mounted on a dedicated mount point (created based on the device volume ID information) created in the "/media" directory. You can add your own hard disk or removable storage device partition information to the "/etc/fstab" file if necessary, and also include remote file systems (NFS, samba, etc) in the "/etc/fstab" file.
[Used Example]
The following is an example that a USB flash memory installed in Raspberry Pi. The next step is to check the device registration status after inserting the USB memory into the Raspberry Pi system.
| pi@raspberrypi3:~ $ lsusb |
| Bus 001 Device 007: ID 045e:008a Microsoft Corp. Wireless Keyboard and Mouse Bus 001 Device 005: ID 1c4f:0002 SiGma Micro Keyboard TRACER Gamma Ivory Bus 001 Device 008: ID 0781:5567 SanDisk Corp. Cruzer Blade Bus 001 Device 003: ID 0424:ec00 Standard Microsystems Corp. SMSC9512/9514 Fast Ethernet Adapter Bus 001 Device 002: ID 0424:9514 Standard Microsystems Corp. Bus 001 Device 001: ID 1d6b:0002 Linux Foundation 2.0 root hub |
However, if you check the "/media" directory to check the mount status of USB memory, you can see that nothing is mounted.
| pi@raspberrypi3:~ $ ls -l /media/pi |
| total 4 drwx------ 2 root root 4096 Jun 13 2016 SETTINGS |
This time, we change the configuration to start the Desktop window immediately using LXDE program, then reboot and check the "/media" directory. You will see that the USB memory is mounted in the "/media" directory.
| pi@raspberrypi3:~ $ ls -l /media/pi |
| total 8 drwx------ 8 pi pi 4096 Jan 1 1970 ESD-USB drwx------ 2 root root 4096 Jun 13 2016 SETTINGS |
Next, I checked the status of the mount from the Desktop window. You can see that the USB memory is mounted.
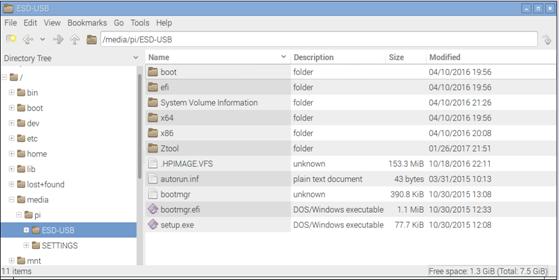
Figure 15‑1 USB device mount
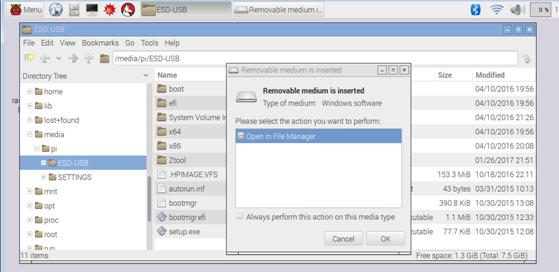
Now this time, we will connect the USB memory to the Raspberry Pi system in the Desktop window state. Then you will see the popup screen to confirm whether or not to mount.
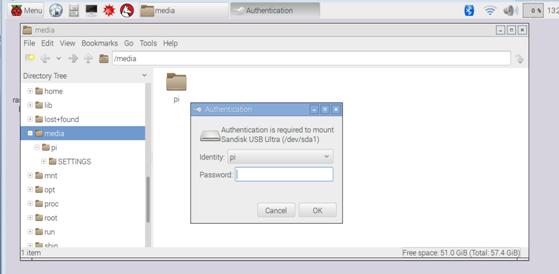
If you enter the user password here, the USB memory is automatically mounted. When the mount is completed, a popup screen will appear asking if you want to see the contents. You can see that the USB memory is mounted by looking in the "/media" folder.