Published Book on Amazon
| All of IOT Starting with the Latest Raspberry Pi from Beginner to Advanced – Volume 1 | |
| All of IOT Starting with the Latest Raspberry Pi from Beginner to Advanced – Volume 2 |
출판된 한글판 도서
| 최신 라즈베리파이(Raspberry Pi)로 시작하는 사물인터넷(IOT)의 모든 것 – 초보에서 고급까지 (상) | |
| 최신 라즈베리파이(Raspberry Pi)로 시작하는 사물인터넷(IOT)의 모든 것 – 초보에서 고급까지 (하) |
Original Book Contents
22.1 Using Raspberry Pi camera
22.1.1 Basics of Camera
22.1.1.1 Installing Raspberry Pi Dedicated Camera
The Raspberry Pi dedicated camera is installed by connecting the ribbon cable to the CSI port on the main body. Please refer to the description of [3.9.3 Raspberry Pi Dedicated Camera] for information about type of camera and how to install it.
|
|
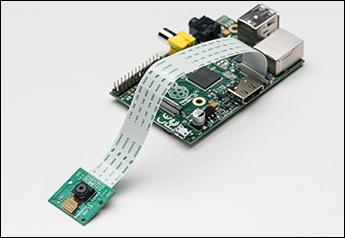
Figure 22‑1 Image of Raspberry Pi camerar installed
22.1.1.2 Setup of Raspberry Pi Camera and GPU Memory
To use a Raspberry Pi camera, the camera must first be enabled. Please refer to the description of [9.8.1 Enabling Raspberry Pi Camera] for detailed configuration method.
Also, for the Raspberry Pi camera to work properly, GPU memory must be properly allocated, and at least 128 Mega should be assigned to the GPU. Please refer to the explanation of [9.7.2 Adjusting GPU Memory] for detailed configuration method.