Published Book on Amazon
| All of IOT Starting with the Latest Raspberry Pi from Beginner to Advanced – Volume 1 | |
| All of IOT Starting with the Latest Raspberry Pi from Beginner to Advanced – Volume 2 |
출판된 한글판 도서
| 최신 라즈베리파이(Raspberry Pi)로 시작하는 사물인터넷(IOT)의 모든 것 – 초보에서 고급까지 (상) | |
| 최신 라즈베리파이(Raspberry Pi)로 시작하는 사물인터넷(IOT)의 모든 것 – 초보에서 고급까지 (하) |
Original Book Contents
22.1.7 Broadcasting Video over Internet
22.1.7.1 Framework to Transmit Video over Web
Here, we want to use the following framework to broadcast video over the Web.
Briefly explaining the above picture, a video taken by a Raspberry Pi camera is transfered to <VLC> program, and the <VLC> program transmits the video data over the web via a network. Then the <VLC> program of the computer on the Internet receives the data and plays the video.
If "raspivid" command is executed to shoot a video, the video data is taken through MMAL API from the camera. The video is sent to the standard output, and goes through "pipe" and is passed to <VLC> program.
On the other hand, if you specify the "/dev/video0" device of Raspberry Pi system directly in <VLC> program, you will shoot video directly from the camera through V4L2 API.
To do the operation like the above, <VLC> program or another program that has the same role as <VLC> program need to be installed on Raspberry Pi and a computer on the Web.
For more information about <VLC> media player and the program download, please refer to the following:
22.1.7.2 <VLC> server – Transmit Video from Raspberry Pi
First, <VLC> program need to be installed on Raspberry. Install <VLC> program as follows.
| sudo apt-get install vlc |
Once the program installation is completed, videos shot by the Raspberry Pi system can be transmitted to the Web via <VLC> program. The basic format of command to execute server with <VLC> program is as follows
| cvlc <input-device-mode>://<input-device> --sout <stream-output & port> |
At the beginning of this command, the input stream is specified.
■ stream Input in stream format
■ V4L2 Input coming in through V4L2 driver
■ file:///path/file Plain media file
■ http://host[:port]/file HTTP URL
■ ftp://host[:port]/file FTP URL
■ mms://host[:port]/file MMS URL
■ screen:// Screen capture
■ dvd://[device] DVD device
■ vcd://[device] VCD device
■ cdda://[device] Audio CD device
■ udp://[[<source >]@[<bind >][:<bind port>]] UDP stream sent by a streaming server
Later in this command, several options for processing stream output with "--sout" (stream output) option will be specified. According to the method specified here, the method used when <VLC> client connects should be different. Here also the port that the stream output is transmitted to is specifid. The default port used is "8554". <VLC> clients use this port to access <VLC> server.
The followings are a description about commonly used processing methods.
■ http -- '#standard{access=http,mux=ts,dst=:<port>}'
-- VLC client connection -- Connect with "http://URL:port/" format.
■ rtsp -- '#rtp{sdp=rtsp://: =:<port>/}'
-- VLC client connection -- Connect with "rtsp://URL:port/" format.
For the various Web broadcasting using <VLC>, please refer to the following:.
■ http://www.mybigideas.co.uk/RPi/RPiCamera/
First, we will handle broadcasting with the MMAL driver. First, run the following command to shoot a video with "raspivid" command.
|
| raspivid -t 999999 -o - | cvlc stream:///dev/stdin --sout #standard{access=http,mux=ts,dst=:8554}' :demux=h264 | ||
In the above operation, "raspivid" command sends the recorded video to standard output and transfers it to <VLC> program through "pipe". <VLC> then reads the video data through "/dev/stdin" device. <VLC> processes the received video to stream output using "HTTP" method and port "8554". In this case, <VLC> client should use "http://URL:port/" format when connecting.
The next is to capture video using V4L2 driver and process it to stream output using "HTTP" method.
| cvlc v4l2:///dev/video0 --v4l2-width 640 --v4l2-height 480 --v4l2-chroma h264 --sout '#standard{access=http,mux=ts,dst=:8554}' :demux=h264 |
In the above operation, video is recorded using V4L2 driver through "/dev/video0" device. <VLC> reads video data using "/dev/video0" device and processes the video to stream output using "HTTP" method and port "8554". In this case, <VLC> client should use "http://URL:port/" format when connecting.
The nextis to take the video using V4L2 driver and process it to stream output using"RTSP" method.
| cvlc v4l2:///dev/video0 --v4l2-width 640 --v4l2-height 480 --v4l2-chroma h264 --sout '#rtp{sdp=rtsp://:8554/}' :demux=h264 |
In the above operation, <VLC> reads video data using "/dev/video0" device and processes the video to stream output using "RTSP" method and port "8554". In this case, <VLC> client should use the format "rtsp://URL: port/" when connecting.
22.1.7.3 <VLC> client – Playing Video on MS Windows
To execute <VLC> client on MS Windows computer, first we have to download and install <VLC> program.
When the installation is complete, run the program. Then the following screen appears.
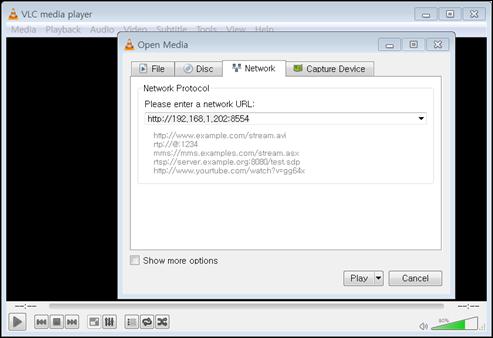
Select menu Media àOpen Network Stream and specify connection information for <VLC> server that you want to connect. Here, you need to input the IP address for the Raspberry Pi and the port specified in the server.
| http://<VLC-Server IP address>:<VLC-server-Port> |
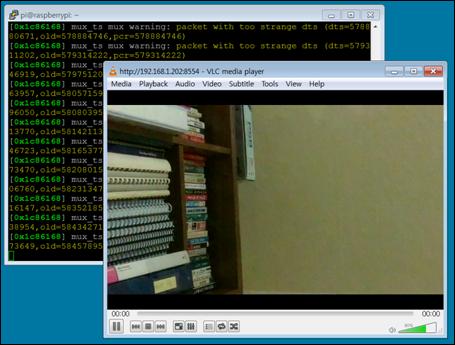
After completing connection setting, click [Play] button and you can view the video screen transmitted from Raspberry Pi as follows.