Published Book on Amazon
| All of IOT Starting with the Latest Raspberry Pi from Beginner to Advanced – Volume 1 | |
| All of IOT Starting with the Latest Raspberry Pi from Beginner to Advanced – Volume 2 |
출판된 한글판 도서
| 최신 라즈베리파이(Raspberry Pi)로 시작하는 사물인터넷(IOT)의 모든 것 – 초보에서 고급까지 (상) | |
| 최신 라즈베리파이(Raspberry Pi)로 시작하는 사물인터넷(IOT)의 모든 것 – 초보에서 고급까지 (하) |
Original Book Contents
24.3.4 간단한 HTML Web 페이지
24.3.4.1 다른 URL에 대한 link 사용
다음은 특정 문장에 다른 홈페이지의 URL을 link한 사례로서, 해당 문장을 클릭하면 지정된 URL로 화면이 전환된다.
| <!DOCTYPE html> <html> <body> <p><a href=" http://www.raspberrypi.org/">Visit our homepage for many information</a></p> </body> </html> |
해당 HTML을 실행하면 아래와 같이 URL이 연결된 문장이 나타난다.

그림 24‑4 HTML과 Hyper-link
위의 문장을 마우스로 클릭하면, 아래의 화면으로 전환된다.

24.3.4.2 table 사용하기
다음은 table을 정의하면서 동시에 table의 제목을 지정한 예이다.
| <!DOCTYPE html> <html> <head> <style> table, th, td { border: 1px solid black; border-collapse: collapse; } th, td { padding: 5px; } </style> </head> <body> <table style="width:100%"> <tr> <th>Firstname</th> <th>Lastname</th> </tr> <tr> <td>Jill</td> <td>Smith</td> </tr> <tr> <td>Eve</td> <td>Jackson</td> </tr> </table> </body> </html> |
위의 HTML을 실행하면 아래와 같이 Table 자료가 화면에 나타난다.
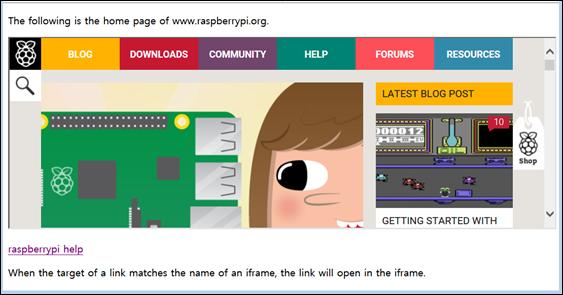
그림 24‑5 HTML table 사례
24.3.4.3 frame 사용하기
다음은 "iframe" tag를 사용하여 화면의 일부에 frame을 정의하고, 다른 URL의 내용을 보여주는 사례이다.
| <!DOCTYPE html> <html>
<body>
<p>The following is the home page of www.raspberrypi.org.</p>
<iframe width="100%" height="300px" src="http://www.raspberrypi.org/" name="iframe_a"></iframe>
<p><a href="http://www.raspberrypi.org/help" target="iframe_a">raspberrypi help</a></p>
<p>When the target of a link matches the name of an iframe, the link will open in the iframe.</p>
</body>
</html>
|
위의 HTML을 실행하면 아래와 같이 화면 중간에 다른 web site의 내용을 보여주는 frame이 만들어진다. 화면 아래에 있는 "raspberrypi help" 문장을 누르면 frame에서 기존에 보이던 내용이 다른 내용으로 변경되는 것을 확인할 수 있다.

그림 24‑6 HTML iframe 사례
24.3.4.4 style 사용
● internal style (internal CSS)
internal style은 해당 문서 내부의 HTML <head> 부분에서 style을 정의한다. 여기서 정의한 내용은 해당 문서에만 적용되고, 다른 문서에는 적용되지 않는다.
| <!DOCTYPE html> <html> <head> <style> body {background-color:lightgrey} h1 {color:blue} p {color:green} </style> </head> <body>
<h1>This is a heading</h1> <p>This is a paragraph.</p>
</body> </html> |
위의 <head> tag에서 <body>, <h1>, <p> tag에 style이 정의되었다.
아래 결과를 보면 <style> tag에서 지정한 내용대로 각 tag에 style이 적용되어 있는 것을 확인할 수 있다.
|
|

그림 24‑7 HTML internal styling 사례
● external style (external CSS)
external style은 별도의 외부 CSS file에 저장하고, 해당 HTML 페이지의 <head> 부분에서 <link> tag을 사용하여 연결된다.
external style sheet는 여러 page에 동일한 style을 적용하고자 할 때 편리하다. 이런 방식을 사용하면, CSS 파일의 내용만 변경하여 그것이 적용되는 모든 web 페이지를 한꺼번에 변경할 수 있다.
| <!DOCTYPE html> <html> <head> <link rel="stylesheet" href="styles.css"> </head> <body>
<h1>This is a heading</h1> <p>This is a paragraph.</p>
</body> </html> |
다음은 위의 HTML 문서에서 참조한 "styles.css" CSS style 파일이다.
| <style> body {background-color:lightgrey} h1 {color:blue} p {color:green} </style> |
이전의 internal style 사례와 동일한 style의 web 페이지를 작성할 수 있다.
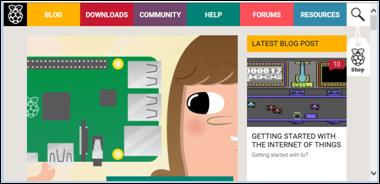
그림 24‑8 HTML external styling 사례
24.3.4.5 form을 이용한 자료 입력
다음은 <form> tag를 사용하여 화면에 자료를 입력할 수 있는 자리를 만들고, 자료를 입력한 후 화면에서 특정 버튼을 눌러서 입력된 자료를 web server로 전송하는 방법을 설명하는 사례이다.
| <!DOCTYPE html> <html> <body>
<form action="action_page.php" method="POST">
First name: <input type="text" value="Mickey"> <br> Last name: <input type="text" name="lastname" value="Mouse"> <br>
<input type="radio" name="sex" value="male" checked>Male <br>
<input type="submit" value="Send">
</form>
<p>If you click "Send", the form-data will be sent to a page called "action_page.php".</p>
<p>The first name will not be submitted, because the input element does not have a name attribute.</p>
</body> </html> |
■ <input>의 "name" 속성
<input>을 정의할 때 지정한 "name" 속성은 해당 form 내에서 해당 입력값을 지정하는 key의 역할을 한다. 따라서 "name" 속성이 지정되지 않으면 form 내에 있는 자료를 구분할 수 없다. 따라서 <form>에서 지정한 method인 "GET"이나 "POST" 방식을 이용하여 form 자료를 web server로 보낼 때, "name" 속성이 지정되지 않은 자료는 전송하지 않는다.
■ <input>의 "type" 속성 : "submit" 값
"type"이 "submit" 값을 가지는 <input>은 form의 input 자료를 web server의 form-handler로 보내는 버튼을 정의하는 것이다. form-handler는 통상 입력 자료를 처리하는 web server에 있는 script 파일인데, <form> tag의 "action" 속성에서 지정된다.
■ <form>의 "action" 속성
"action" 속성은 form 자료를 web server로 전송(submit)할 때 수행해야 할 다음 동작을 지정한다. 통상 form 자료는 web server에 있는 특정 web page 파일에 지정된다. "submit"을 위한 가장 간단한 방법은 form 내에 정의된 "submit" 버튼을 이용하는 것이다.
■ <form>의 "method" 속성
"method" 속성은 form 자료를 web server로 전송할 때 사용되는 HTTP 전송방식을 지정하는데, "GET"과 "POST" 방식을 사용할 수 있다. 특별히 지정하지 않으면 "GET" 방식이 default 값이다.
"GET" 방식을 사용하면, 전송되는 form data는 요청 page 주소와 함께 아래와 같이 표시된다. "GET" 방식은 전송하는 자료의 양에 제한이 있어서 많은 자료를 처리하는 곳에서는 사용하기에 부적절하다. 이 방식을 사용하면 전송 URL에 전송 자료가 함께 표시되므로, 표시된 URL 내용을 그대로 "즐겨찾기" 등에 함께 보관해서, 나중에 다시 사용할 수 있다. 따라서 자료 양이 많지 않고 민감하지 않은 자료를 전송할 때 "GET" 방식을 사용하는 것이 좋다.
| action_page.php?firstname=Mickey&lastname=Mouse |
"POST" 방식은 내부적인 function을 이용해서 web server로 자료를 전송하기 때문에 전송하는 자료가 URL에 표시되지 않는다. 따라서 web server의 자료를 변경하거나 password와 같은 민감한 자료를 처리할 때는 "POST" 방식을 사용하는 것이 좋다.