Published Book on Amazon
| All of IOT Starting with the Latest Raspberry Pi from Beginner to Advanced – Volume 1 | |
| All of IOT Starting with the Latest Raspberry Pi from Beginner to Advanced – Volume 2 |
출판된 한글판 도서
| 최신 라즈베리파이(Raspberry Pi)로 시작하는 사물인터넷(IOT)의 모든 것 – 초보에서 고급까지 (상) | |
| 최신 라즈베리파이(Raspberry Pi)로 시작하는 사물인터넷(IOT)의 모든 것 – 초보에서 고급까지 (하) |
Original Book Contents
24.4.9 PHP script 파일의 포함
PHP에서는 특정 파일에 있는 text/code/markup을 현재 작업문서에 삽입하여 사용할 수 있는 방법을 제공하고 있다. PHP에서 동일한 PHP, HTML 또는 text를 여러 page에 반복적으로 사용할 필요가 있을 때 이러한 기능은 아주 유용하다.
PHP에서 "include" 또는 "require" 문을 이용하면 web server가 특정 문서를 실행하기 전에 특정 PHP file의 내용을 현재 문서의 PHP file에 삽입할 수 있다.
24.4.9.1 "include" 문 및 "require" 문
"include" 와 "require" 문은 지정된 파일의 내용을 현재 문서에 삽입한다. 다음과 같은 형식을 이용한다.
| include 'filename'; |
| require 'filename'; |
Include할 파일을 찾을 때는 명시적으로 지정된 file path가 있으면 그것을 사용한다. file path가 명시적으로 지정되면, 그것이 절대경로이든지 상대경로이든지 상관없이 환경변수 "include_path"는 무시된다.
만약 file path가 지정되지 않으면, 환경변수 "include_path"에 지정된 path를 사용한다. 파일이 환경변수 "include_path"에서 지정한 곳에도 없으면, "include"를 호출한 script의 자체 directory와 현재 작업 directory를 검색하여 파일을 찾는다.
"include"와 "require"는 모두 지정 파일의 내용을 현재 문서에 삽입해 주는데, 서로 약간의 차이가 있다.
■ include
■ 해당 문장이 실행되는 시점에 내용이 추가된다. 따라서 조건문 내부에 있는 경우는 해당 조건이 충족되는 경우에만 내용이 추가된다.
■ 해당 문장이 실행될 때마다 내용이 추가된다. 따라서 반복적으로 처리되면 여러 번 추가된다.
■ 지정된 file이 없어서 오류가 발생한 경우는 warning 메시지를 보내고 처리를 계속한다.
■ require
■ 문서가 시작되면 반드시 실행된다. 따라서 조건문 내부에 있더라도 조건과 상관없이 실행된다
■ 문서에서 한번만 추가된다. 따라서 반복적으로 실행되더라도 한번만 추가된다.
■ 지정된 file이 없어서 오류가 발생한 경우는 fatal error 메시지를 보내고 처리를 중단한다.
[사용 Example]
다음의 내용이 "content.php" 파일에 작성되어 있으며, 다른 page에 포함될 내용이다.
| <?php $color = 'green'; $fruit = 'apple'; ?> |
다른 문서에서 위의 "content.php"를 포함하는 사례이다.
| <?php echo "A $color $fruit"; // A include 'content.php'; echo "A $color $fruit"; // A green apple ?> |
다음과 같은 내용이 "footer.php" 파일에 작성되어 있는데, 여러 web page에서 표준 footer로 사용할 것이다.
| <?php echo "<p>Copyright © 2013-" . date("Y") . " www.wemega.com</p>"; ?> |
아래는 위의 "footer.php" 파일을 "require" 문을 사용하여 포함한 것이다.
| <html> <body> <h1>Welcome to my home page!</h1> <p>Some text.</p> <p>Some more text.</p> <?php require 'footer.php';?> </body> </html> |
다음은 조건문에서 "include"와 "require"를 사용한 경우이다. 이 경우는 "A.php"와 "B.php"가 모두 포함될 것이다. 왜냐하면 "require"는 항상 파일 내용을 포함하기 때문이다.
| <?php $value = 0; if( $value == 0 ) { include("A.php"); } else { require("B.php"); } ?> |
아래는 "include"를 사용하고 있는데, 존재하지 않는 파일을 지정하고 있는 사례이다. 이 script는 포함시킬 파일이 없으므로 warning 메시지를 보내고 처리를 계속한다.
| <html> <body> <h1>Welcome to my home page!</h1> <?php include 'noFileExists.php'; echo "I have a $color $car."; ?> </body> </html> |
아래는 "require"를 사용하고 있는데, 존재하지 않는 파일을 지정하고 있는 사례이다. 이 script는 포함시킬 파일이 없으므로, fatal error 메시지를 보내고 처리를 중단한다.
| <html> <body> <h1>Welcome to my home page!</h1> <?php require 'noFileExists.php'; echo "I have a $color $car."; ?> </body> </html> |
24.4.9.2 "include_once" 문과 "require_once" 문
한 문서에서 동일한 파일이 여러 번 포함되면 곤란한 경우, 한번만 삽입되도록 지시할 수 있다. "include_once" 문과 "require_once" 문을 사용하면 지정된 파일의 내용을 현재 문서에 한번만 삽입한다.
| include_once 'filename'; |
| require_once 'filename'; |
■ include_once
■ include와 기본적인 기능은 동일하다.
■ 문서에 이미 로드된 동일 문서가 있다면 더 이상 추가하지 않는다
■ require_once
■ require와 기본적인 기능은 동일하다.
■ 문서에 이미 로드된 동일 문서가 있다면 더 이상 추가하지 않는다
[사용 Example]
다음은 "echo.php" 파일이다.
| <?php echo "Hello"; ?> |
다음은 다른 파일에서 "echo.php"를 포함시킨 것이다. 이것을 실행하면 "Hello"가 한번만 출력될 것이다. 왜냐하면 앞에서 "require" 문에 의해서 해당 파일이 이미 포함되었으므로 "require_once" 명령이 다시 포함시키지 않기 때문이다.
| test.php <?php require('echo.php'); require_once('echo.php'); ?> |
24.4.10 PHP 전송방식 및 주요 Global 변수
24.4.10.1 HTTP의 POST/GET 방식과 PHP에서의 처리
web browser가 web server를 호출하여 필요한 자료를 전송할 때는 GET 방식과 POST 방식을 사용할 수 있다.
● GET 방식
GET 방식은 전송자료를 URL 형식으로 구성하여 다음과 같은 형식으로 요청을 보낸다.
| http://URL/?key1=value1&key2=value2 |
URL과 전송자료 사이에 "?" 기호를 사용하여 구분한다. 전송자료는 "key=value" 형식으로 지정하고 여러 개의 자료가 있는 경우는 "&" 기호로 구분한다.
이 방식에서는 전송하는 전체 내용이 URL 형식으로 표시가 되며, web browser에 그대로 표시된다. 또한 GET 방식은 전송하는 자료의 양에 제한이 있지만, POST 방식에 비해 처리속도가 상대적으로 빠르다.
이 방식은 URL에 표시된 내용을 그대로 "즐겨찾기" 등에 함께 보관해서 나중에 다시 사용할 수 있는 편리성이 있지만, 비밀유지가 필요한 자료를 보낼 때는 사용하기 곤란하다. 따라서 GET 방식은 자료 양이 많지 않고 민감하지 않은 자료를 전송할 때 사용하는 것이 좋다.
이렇게 전송된 자료는 web server에서 "$_GET" array 변수와 "$_REQUEST" array 변수에 저장된다. 여기에 저장된 값은 다음과 같이 사용한다.
| $variable = $_GET["key"] |
| $variable = $_REQUEST["key"] |
[사용 Example]
다음은 HTML 문서의 "form" tag에서 GET 방식이 지정된 것을 보여준다.
| <form action="employee.php" method="get"> Name: <input type="text" name="username" /><br /> Email: <input type="text" name="email" /><br /> <input type="submit" name="submit" value="Submit me!" /> </form> |
다음은 위에서 호출한 "employee.php" 파일에서 "$_GET" 변수와 "$_REQUEST" 변수를 이용해서 전송된 자료를 참조하고 있는 것을 보여준다.
| <?php echo $_GET['username']; echo $_REQUEST['username']; ?> |
● POST 방식
POST 방식은 전송하는 자료를 URL의 일부로 보내지 않는다. POST 방식을 사용하는 경우는 web client가 web server를 호출한 다음 내부적으로 POST 함수를 호출하여 함수의 argument로 전송자료를 직접 전송하게 된다.
POST 방식은 전송하는 자료의 양에 제한이 없어서 많은 자료 처리가 필요한 곳에서도 자유롭게 사용할 수 있다. 이 방식을 사용하면 전송하는 자료는 web browser에 URL형식으로 표시가 되지 않으므로 비밀유지가 필요한 자료를 보낼 때도 문제 없이 사용할 수 있다.
이렇게 전송된 자료는 web server에서 "$_POST array" 변수와 "$_REQUEST" array 변수에 저장된다. 여기에 저장된 값은 다음과 같이 사용한다.
| $variable = $_POST["key"] |
| $variable = $_REQUEST["key"] |
다음은 HTML 문서의 "form" tag에서 POST 방식을 지정하고 있는 것을 보여준다.
| <form action="employee.php" method="post"> Name: <input type="text" name="username" /><br /> Email: <input type="text" name="email" /><br /> <input type="submit" name="submit" value="Submit me!" /> </form> |
다음은 위에서 호출한 "employee.php" 파일에서 "$_POST" 변수와 "$_REQUEST" 변수를 이용해서 전송된 자료를 참조하고 있는 것을 보여준다.
| <?php echo $_POST['username']; echo $_REQUEST['username']; ?> |
24.4.10.2 PHP의 Global 변수
● $_SERVER
"$_SERVER" 변수는 web server가 생성한 array 자료로서 header, path, script location 등과 같은 정보를 가지고 있다. 모든 web server가 모든 항목에 대한 정보를 동일한 형식으로 제공해 준다는 보장은 없고, web server에 따라 제공되는 항목이 틀려질 수 있다.
여기서 제공되는 주요한 정보는 다음과 같다.
| Element/Code | Description |
| PHP_SELF | Returns the filename of the currently executing script |
| GATEWAY_INTERFACE | Returns the version of the Common Gateway Interface (CGI) the server is using |
| SERVER_ADDR | Returns the IP address of the host server |
| SERVER_NAME | Returns the name of the host server (such as www.w3schools.com) |
| SERVER_PROTOCOL | Returns the name and revision of the information protocol (such as HTTP/1.1) |
| REQUEST_METHOD | Returns the request method used to access the page (such as POST) |
| REQUEST_TIME | Returns the timestamp of the start of the request (such as 1377687496) |
| QUERY_STRING | Returns the query string if the page is accessed via a query string |
| HTTP_HOST | Returns the Host header from the current request |
| HTTPS | Is the script queried through a secure HTTP protocol |
| REMOTE_ADDR | Returns the IP address from where the user is viewing the current page |
| REMOTE_HOST | Returns the Host name from where the user is viewing the current page |
| REMOTE_PORT | Returns the port being used on the user's machine to communicate with the web server |
| SCRIPT_FILENAME | Returns the absolute pathname of the currently executing script |
| SERVER_ADMIN | Returns the value given to the SERVER_ADMIN directive in the web server configuration file (if your script runs on a virtual host, it will be the value defined for that virtual host) (such as someone@w3schools.com) |
| SERVER_PORT | Returns the port on the server machine being used by the web server for communication (such as 80) |
| SCRIPT_NAME | Returns the path of the current script |
| SCRIPT_URI | Returns the URI of the current page |
| DOCUMENT_ROOT | The document root directory under which the current script is executing, as defined in the server's configuration file. |
아래는 script 내에서 "$_SERVER" 변수를 사용한 사례이다.
| <html> |
"$_SERVER['PHP_SELF']"를 이용하여 자기 자신의 파일 이름을 결정하여 "action" 속성에 지정하고 있다. "$_SERVER["REQUEST_METHOD"]"를 이용하여 현재 HTTP 요청 method가 무엇인지를 결정하고, 그 방식이 POST 방식인 경우만 필요한 처리를 하고 있다.
● $GLOBALS
"$GLOBALS" 변수는 PHP super global variable로서 "$GLOBALS[index]" array에 모든 global variable를 저장하고 있다. 이 변수를 이용하면 PHP script의 다른 부분이나 function 내부 또는 class의 methods 내부와 같이 어떤 곳에서든지 global variable를 사용할 수 있다. index에는 변수 이름이 지정되어 있다.
해당 변수를 사용하고자 하면 다음과 같은 형식으로 사용할 수 있다.
| $variable = $GLOBALS[‘variable-name’] |
아래는 super global variable $GLOBALS을 어떻게 사용하는지를 보여준다.
| <?php |
24.4.11 PHP와 MySQL database
24.4.11.1 PHP MySQL extension
PHP에서 MySQL 자료를 처리하는 기능들은 PHP의 extension으로 개발되어 제공되고 있는데, 지금까지 개발된 extension에는 다음과 같은 것이 있다.
■ original MySQL extension
PHP에서 MySQL 자료에 접근하기 위해서 처음 개발된 extension 기능이다. 이것은 원래 MySQL version 4.1.3 이전 시스템에만 적용되는 것을 전제로 개발된 것으로, 그 이후 version에도 적용할 수는 있지만, 최신 MySQL server의 기능을 충분히 활용할 수 없으며, 향후 폐기될 기능이다.
■ MySQL improved extension (mysqli)
MySQL database의 최신 기능을 완전하게 활용할 수 있도록 object-oriented programming 환경에 맞추어 재개발된 MySQL 처리 extension이다. PHP versions 5 이후에 기능이 포함되어 있다. mysqli extension은 original MySQL extension에 비해 많은 장점이 있는데, 주요한 것은 다음과 같다.
√ Object-oriented interface
√ Support for Prepared Statements
√ Support for Multiple Statements
√ Support for Transactions
√ Enhanced debugging capabilities
√ Embedded server support
■ PDO extension
PHP application에게 database abstraction layer를 제공하여 실제 사용하는 database의 종류와 상관없이, 모든 database 관련 기능을 일관되게 동일한 형식으로 활용할 수 있도록 해주는 extension이다. 필요하면 다른 database로 간편하게 교체할 수 있는 이점이 있지만, 특정 database의 모든 기능을 충분히 활용할 수 없는 단점이 있다.
original MySQL extension은 향후 폐기될 예정이므로 향후 새로운 프로그램을 개발할 때는 mysqli extension 나 PDO extension을 사용해야 한다.
추가적인 정보에 대해서는 다음을 참고하기 바란다.
■ http://php.net/manual/en/set.mysqlinfo.php
24.4.11.2 <mysqli>의 interface 방식
<mysqli> extension은 object-oriented interface 방식과 함께 procedural interface 방식도 함께 지원한다. 다음은 object-oriented interface 방식과 procedural interface 방식에 대한 사례를 보여 주는 것이다.
| <?php
//========================================= //====== procedural interface //========================================= $mysqli = mysqli_connect("example.com", "user", "password", "database"); if (mysqli_connect_errno($mysqli)) { echo "Failed to connect to MySQL: " . mysqli_connect_error(); }
$res = mysqli_query($mysqli, "SELECT 'A world full of ' AS _msg FROM DUAL"); $row = mysqli_fetch_assoc($res); echo $row['_msg'];
//========================================= //====== object-oriented interface //========================================= $mysqli = new mysqli("example.com", "user", "password", "database"); if ($mysqli->connect_errno) { echo "Failed to connect to MySQL: " . $mysqli->connect_error; }
$res = $mysqli->query("SELECT 'choices to please everybody.' AS _msg FROM DUAL"); $row = $res->fetch_assoc(); echo $row['_msg'];
?> |
위 예제의 출력은 아래와 같다
| A world full of choices to please everybody. |
두 방식에 대한 사용법 상의 차이점은 다음과 같다.
| 작업 | Object-oriented | Procedural |
| object 생성할 때 | new mysqli ( ) | mysqli_connect ( ) |
| 함수를 실행할 때 | $object->function( … ) | mysqli_function($object, … ) |
| arrtibute를 참조할 때 | $object->attribute | mysqli_attribute($object) |
기본적으로 object-oriented 방식이 object를 중심으로 function과 attribute를 체계적으로 분류하여 관리해 주기 때문에 이해하기 쉽고, 개발과 사후 관리에 여러 가지 장점이 있다. 두 방식 사이에는 성능의 차이는 없고, 사용자는 각자의 선호에 따라 원하는 것을 자유롭게 선택할 수 있다. 또한 한 문서에 양쪽 방식을 혼합해서 사용할 수는 있지만, 코드를 이해하기 쉽도록 만들기 위해서는 추천하지 않는다.
24.4.11.3 <mysqli> object-oriented interface 상세
여기서는 <mysqli>의 object-oriented interface의 property와 method에 대해서 상세히 설명하도록 한다.
● "mysqli" class의 property and method
MySQL database에 있는 자료를 이용하려면, 먼저 해당 database에 접속해야 한다. 또한 database에 있는 자료를 이용한 하는 과정에서도 접속은 계속 유지되어야 한다. 이렇게 지정된 MySQL database에 대한 접속을 담당하는 것이 "mysqli connect"이다. 이것은 또한 향후 모든 SQL 처리에서 MySQL과의 연동을 담당한다.
"mysqli" class는 이러한 "mysqli connect"를 관리하고 처리하는 역할을 하는 object class로서, 반드시 미리 object로 생성한 다음 사용해야 한다.
이 class에서 사용할 수 있는 property와 method은 다음과 같다.
| OOP Interface | Description | |
| Properties | $mysqli::affected_rows | Gets the number of affected rows in a previous MySQL operation |
| $mysqli::client_info | Returns the MySQL client version as a string | |
| $mysqli::client_version | Returns MySQL client version info as an integer | |
| $mysqli::connect_errno | Returns the error code from last connect call | |
| $mysqli::connect_error | Returns a string description of the last connect error | |
| $mysqli::errno | Returns the error code for the most recent function call | |
| $mysqli::error | Returns a string description of the last error | |
| $mysqli::field_count | Returns the number of columns for the most recent query | |
| $mysqli::host_info | Returns a string representing the type of connection used | |
| $mysqli::protocol_version | Returns the version of the MySQL protocol used | |
| $mysqli::server_info | Returns the version of the MySQL server | |
| $mysqli::server_version | Returns the version of the MySQL server as an integer | |
| $mysqli::info | Retrieves information about the most recently executed query | |
| $mysqli::insert_id | Returns the auto generated id used in the last query | |
| $mysqli::sqlstate | Returns the SQLSTATE error from previous MySQL operation | |
| $mysqli::warning_count | Returns the number of warnings from the last query for the given link | |
| Methods | mysqli::autocommit() | Turns on or off auto-committing database modifications |
| mysqli::change_user() | Changes the user of the specified database connection | |
| mysqli::character_set_name(), mysqli::client_encoding | Returns the default character set for the database connection | |
| mysqli::close() | Closes a previously opened database connection | |
| mysqli::commit() | Commits the current transaction | |
| mysqli::__construct() | Open a new connection to the MySQL server [Note: static (i.e. class) method] | |
| mysqli::debug() | Performs debugging operations | |
| mysqli::dump_debug_info() | Dump debugging information into the log | |
| mysqli::get_charset() | Returns a character set object | |
| mysqli::get_connection_stats() | Returns client connection statistics. Available only with mysqlnd. | |
| mysqli::get_client_info() | Returns the MySQL client version as a string | |
| mysqli::get_client_stats() | Returns client per-process statistics. Available only with mysqlnd. | |
| mysqli::get_cache_stats() | Returns client Zval cache statistics. Available only with mysqlnd. | |
| mysqli::get_server_info() | NOT DOCUMENTED | |
| mysqli::get_warnings() | NOT DOCUMENTED | |
| mysqli::init() | Initializes MySQLi and returns a resource for use with mysqli_real_connect. [Not called on an object, as it returns a $mysqli object.] | |
| mysqli::kill() | Asks the server to kill a MySQL thread | |
| mysqli::more_results() | Check if there are any more query results from a multi query | |
| mysqli::multi_query() | Performs a query on the database | |
| mysqli::next_result() | Prepare next result from multi_query | |
| mysqli::options() | Set options | |
| mysqli::ping() | Pings a server connection, or tries to reconnect if the connection has gone down | |
| mysqli::prepare() | Prepare an SQL statement for execution | |
| mysqli::query() | Performs a query on the database | |
| mysqli::real_connect() | Opens a connection to a mysql server | |
| mysqli::real_escape_string(), mysqli::escape_string() | Escapes special characters in a string for use in an SQL statement, taking into account the current charset of the connection | |
| mysqli::real_query() | Execute an SQL query | |
| mysqli::refresh() | Flushes tables or caches, or resets the replication server information | |
| mysqli::rollback() | Rolls back current transaction | |
| mysqli::select_db() | Selects the default database for database queries | |
| mysqli::set_charset() | Sets the default client character set | |
| mysqli::set_local_infile_default() | Unsets user defined handler for load local infile command | |
| mysqli::set_local_infile_handler() | Set callback function for LOAD DATA LOCAL INFILE command | |
| mysqli::ssl_set() | Used for establishing secure connections using SSL | |
| mysqli::stat() | Gets the current system status | |
| mysqli::stmt_init() | Initializes a statement and returns an object for use with mysqli_stmt_prepare | |
| mysqli::store_result() | Transfers a result set from the last query | |
| mysqli::thread_id() | Returns the thread ID for the current connection | |
| mysqli::thread_safe() | Returns whether thread safety is given or not | |
| mysqli::use_result() | Initiate a result set retrieval |
표 24‑1 "mysqli" class의 property와 method
● "mysqli_stmt" class의 property and method
"mysqli statement"는 SQL 문장이 실제로 실행을 하기 전에 database의 현재 상태에 따라 가장 효율적으로 실행될 수 있도록 사전에 prepare된 SQL 문을 의미한다. 이렇게 prepare된 SQL 문을 이용하면, SQL 문을 실행하기 전에 SQL 문의 문제점을 확인하고, SQL문을 효율적으로 수행할 수 있는 준비작업을 할 수 있다.
"mysqli_stmt" class는 이런 "mysqli statement"를 관리하고 처리하는 역할을 하는 object class로서, 반드시 미리 object로 생성한 다음 사용해야 한다.
이 class에서 사용할 수 있는 property와 method는 다음과 같다.
| OOP Interface | Description | |
| Properties | $mysqli_stmt::affected_rows | Returns the total number of rows changed, deleted, or inserted by the last executed statement |
| $mysqli_stmt::errno | Returns the error code for the most recent statement call | |
| $mysqli_stmt::error | Returns a string description for last statement error | |
| $mysqli_stmt::field_count | Returns the number of field in the given statement - not documented | |
| $mysqli_stmt::insert_id | Get the ID generated from the previous INSERT operation | |
| $mysqli_stmt::num_rows | Return the number of rows in statements result set | |
| $mysqli_stmt::param_count | Returns the number of parameter for the given statement | |
| $mysqli_stmt::sqlstate | Returns SQLSTATE error from previous statement operation | |
| Methods | mysqli_stmt::attr_get() | Used to get the current value of a statement attribute |
| mysqli_stmt::attr_set() | Used to modify the behavior of a prepared statement | |
| mysqli_stmt::bind_param() | Binds variables to a prepared statement as parameters | |
| mysqli_stmt::bind_result() | Binds variables to a prepared statement for result storage | |
| mysqli_stmt::close() | Closes a prepared statement | |
| mysqli_stmt::data_seek() | Seeks to an arbitrary row in statement result set | |
| mysqli_stmt::execute() | Executes a prepared Query | |
| mysqli_stmt::fetch() | Fetch results from a prepared statement into the bound variables | |
| mysqli_stmt::free_result() | Frees stored result memory for the given statement handle | |
| mysqli_stmt::get_result() | Gets a result set from a prepared statement. Available only with mysqlnd. | |
| mysqli_stmt::get_warnings() | NOT DOCUMENTED | |
| $mysqli_stmt::more_results() | NOT DOCUMENTED Available only with mysqlnd. | |
| $mysqli_stmt::next_result() | NOT DOCUMENTED Available only with mysqlnd. | |
| mysqli_stmt::num_rows() | See also property $mysqli_stmt::num_rows | |
| mysqli_stmt::prepare() | Prepare an SQL statement for execution | |
| mysqli_stmt::reset() | Resets a prepared statement | |
| mysqli_stmt::result_metadata() | Returns result set metadata from a prepared statement | |
| mysqli_stmt::send_long_data() | Send data in blocks | |
| mysqli_stmt::store_result() | Transfers a result set from a prepared statement |
표 24‑2 "mysqli_stmt" class의 property와 method
● mysqli_result의 properties and method
"mysqli result"는 SQL SELECT문을 실행한 결과로 만들어지는 query result로서 특정 database의 지정 table들에서 조회되는 여러 개의 row로 구성되는 data set을 의미한다. 여기서 조회되는 각각의 row는 또 다시 복수의 column으로 구성되어 있다.
"mysqli_result" class는 이런 "mysqli result"를 관리하고 처리하는 역할을 하는 object class로서, 반드시 미리 object로 생성한 다음 사용해야 한다.
이 class에서 사용할 수 있는 property와 method는 다음과 같다.
| OOP Interface | Description | |
| Properties | $mysqli_result::current_field | Get current field offset of a result pointer |
| $mysqli_result::field_count | Get the number of fields in a result | |
| $mysqli_result::lengths | Returns the lengths of the columns of the current row in the result set | |
| $mysqli_result::num_rows | Gets the number of rows in a result | |
| Methods | mysqli_result::data_seek() | Adjusts the result pointer to an arbitrary row in the result |
| mysqli_result::fetch_all() | Fetches all result rows and returns the result set as an associative array, a numeric array, or both. Available only with mysqlnd. | |
| mysqli_result::fetch_array() | Fetch a result row as an associative, a numeric array, or both | |
| mysqli_result::fetch_assoc() | Fetch a result row as an associative array | |
| mysqli_result::fetch_field_direct() | Fetch meta-data for a single field | |
| mysqli_result::fetch_field() | Returns the next field in the result set | |
| mysqli_result::fetch_fields() | Returns an array of objects representing the fields in a result set | |
| mysqli_result::fetch_object() | Returns the current row of a result set as an object | |
| mysqli_result::fetch_row() | Get a result row as an enumerated array | |
| mysqli_result::field_seek() | Set result pointer to a specified field offset | |
| mysqli_result::free(), mysqli_result::close, mysqli_result::free_result | Frees the memory associated with a result |
표 24‑3 "mysqli_result" class의 property and method
24.4.11.4 [mysqli] Object-oriented interface 사용법
PHP에서 MySQL database에 있는 자료를 참조하기 위해서는 사전에 해당 database에 접속(connect)되어 있어야 한다.
● "connect" object 생성
MySQL database에 connect 하기 위해서는 먼저 database 접속정보를 이용하여 connect 작업을 수행해서 object를 생성한 다음, 그 database에 대한 connect 정보를 "connect" object에 보관해 둔다. 나중에 실제로 database의 자료를 참조하기 위해서 SQL 문장을 수행할 필요가 있을 때는 앞에서 생성한 "connect" object를 통하여 SQL 문장을 실행하는 것이다.
MySQL database에 접속하기 위해서는 "mysqli( )" 함수를 실행하고, "new" 명령을 사용하여 object를 생성하여 "connect" object 변수에 connect 정보를 저장한다. 기본적인 형식은 다음과 같다.
| $connect_object = new mysqli( ‘host-name’ , ‘user-id’ , ‘password’ , ‘database-name’ ) |
● database 자료 조회 SQL 실행
MySQL의 database에 대해서 특정 SQL 문장을 처리할 경우는 "query( )" 함수를 사용한다. "query( )" 함수는 SQL 문장의 실행 결과를 되돌려 주는데, "result object"라는 형태의 object로 결과를 되돌려준다. 기본적인 처리 형식은 다음과 같다.
| $result_object = $connect_object->query( "SELECT-SQL" ) |
● 조회된 database 자료 처리
"result" object에는 여러 개의 자료가 함께 포함되어 있을 수 있다. "fetch_assoc( )" 함수를 이용하면, "result" object에 포함되어 있는 자료를 순차적으로 하나씩 되돌려 주는데, "row" object라는 형태의 object로 결과를 되돌려 준다. 기본적인 처리형식은 다음과 같다.
| $row_object = $result_object->fetch_assoc( ) |
"row" object에는 여러 개의 column에 대한 자료가 함께 포함되어 있다. 각각의 column에 대한 자료를 참조하고자 하면 ["column-name"] 형식으로 column을 지정한다. 기본적인 처리형식은 다음과 같다.
| $data-variable = $row_object["column-name"] |
통상적으로 "result" object에는 여러 개의 자료가 있으므로 순차적으로 반복적인 처리를 위해서 보통 "while" 명령을 사용하여 다음과 같이 처리한다.
| while ( $row_object = $result_object->fetch_assoc( ) ) { statement-1 ; statement-2 ; } |
● "connect" 종료
더 이상 database 접속이 필요 없을 때는 다음과 같이 "close( )" 함수를 사용하여 "connect"를 종료시켜야 한다. 기본적인 처리 형식은 다음과 같다.
| $connect_object->close( ) |
24.4.12 간단한 PHP Web 페이지
우리는 여기서 PHP를 이용해서 MySQL에 있는 자료를 조회, 입력, 수정, 삭제하는 작업을 해 볼 것이다.
24.4.12.1 Main 문서의 준비
다음과 같은 문서를 작성하고 "index.php" 파일에 저장한다.
| <!DOCTYPE html> <html> <head> <title> Handling Employee Information By MySQL and PHP </title> </head> <body> <p><a href=" /employee_list.php"> Employee List </a></p> <p><a href="/employee_update.php"> Employee Detail Update</a></p> </body> </html> |
위 문서에서는 "Employee List" 문구에 대해서 "/employee_list.php" script 파일이 연결되어 있고, "Employee Detail Update" 문구에 대해서 "/employee_update.php" script 파일이 연결되어 있다.
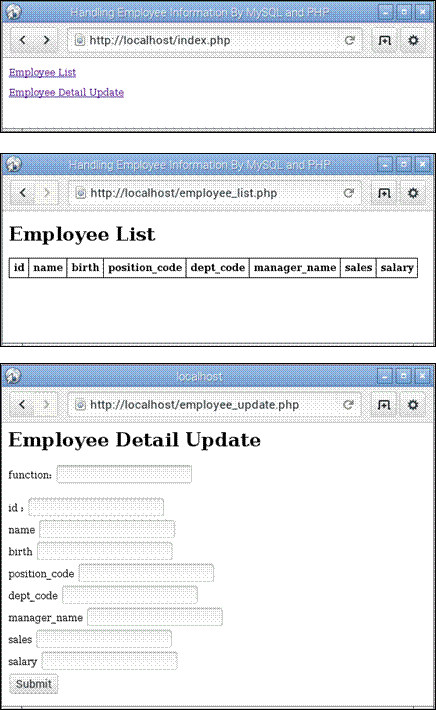
이 파일을 web browser를 통해서 실행하면 다음과 같은 화면이 나타난다.
|
|
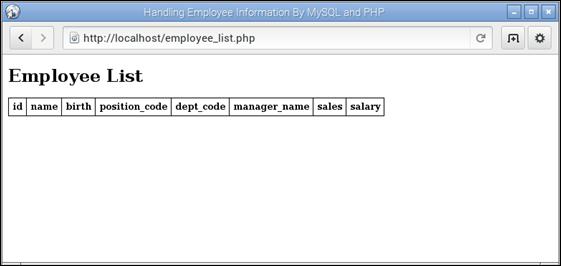
그림 24‑10 PHP Web 사례- main 문서의 시작화면
이것은 앞으로 처리할 작업에 대한 main 시작화면을 위한 문서이다. 여기서 화면에서 "Employee List"를 클릭하면 database의 "employee" table에서 자료를 조회하는 web page로 진행하게 될 것이고, "Employee Detail Update"를 클릭하면 database의 "employee" table의 자료를 변경하는 web page 화면으로 진행하게 될 것이다.
24.4.12.2 database 및 table 준비 작업
여기서 사용하는 database는 앞에서 MySQL을 설명할 때 사용했던 database와 table을 이용할 것이다. 구체적인 내용은 다음과 같다.
■ database -- raspi_db
■ table -- employee
■ id -- INT -- PRIMARY KEY, AUTO_INCREMENT
■ name -- VARCHAR(50)
■ birth -- DATE
■ position_code -- CHAR(10)
■ dept_code -- CHAR(10)
■ manager_name -- VARCHAR(50)
■ sales -- DECIMAL(10,0)
■ salary_rate -- NUMERIC(6,2)
24.4.12.3 database 연결과 종료
● database 연결
여기서는 <mysqli> extension을 사용하여 database에 접속할 것이다. database 연결에 필요한 정보는 다음과 같다.
■ host name -- localhost
여기에는 IP address나 host에 대한 URL을 지정할 수 있는데, 여기서는 MySQL이 동일한 server에 설치되어 있으므로 "localhost"를 사용하였다.
■ user -- pi
■ password -- xxxxxx
■ database -- raspi_db
먼저 아래와 같이 mysqli object를 생성하여 MySQL database에 연결하도록 한다.
| <?php $mysqli = new mysqli('localhost', 'pi', 'xxxxxx', 'raspi_db');
echo 'Success... ' . $mysqli->host_info . "\n";
?> |
여기서는 "mysqli" object를 생성하여 "$mysqli" 변수에 저장한다. object가 생성되면서 내부적으로 MySQL database에 대한 연결을 시도하게 되고, 연결이 정상적으로 완료되면, connection과 관련된 모든 정보가 "$mysqli" 변수에 저장된다. "$mysqli" 변수에 저장된 object는 차후 MySQL과의 모든 작업을 처리해 준다.
● database 연결 종료
database에 대한 모든 처리가 종료되면, 해당 database에 대한 연결을 종료시킨다. 다음과 같이 처리할 수 있다.
| <?php $mysqli->close( ) ; ?> |
24.4.12.4 database table 자료를 조회하는 script 작성
여기서는 database의 employee table에 있는 자료를 조회하는 script를 작성하도록 한다.
● 기본 HTML 및 table layout 작성
다음과 같은 HMTL내용을 가지는 PHP 파일을 만들고 "employee_list.php"에 저장한다.
| <!DOCTYPE html> <html> <head> <title> Handling Employee Information By MySQL and PHP </title> <style> table, th, td { border: 1px solid black; border-collapse: collapse; } th, td { padding: 5px; } </style> </head>
<body> <h1>Employee List</h1> <table> <!-- table의 header --> <tr> <th>id </th> <th>name </th> <th>birth </th> <th>position_code </th> <th>dept_code </th> <th>manager_name </th> <th>sales </th> <th>salary </th> </tr> </table> </body> </html> |
여기서는 조회된 여러 개의 목록자료를 table layout으로 표시해 주기 위해 <table> tag를 이용하여 HTML문서를 만들고 있다. <table>을 정의할 때 header 부분이 추가되어 있고, <head> 부분에서 table의 각 부분에 대해서 <style>이 지정되어 있다.
이 script를 실행해 보면 아래와 같은 화면이 표시된다.
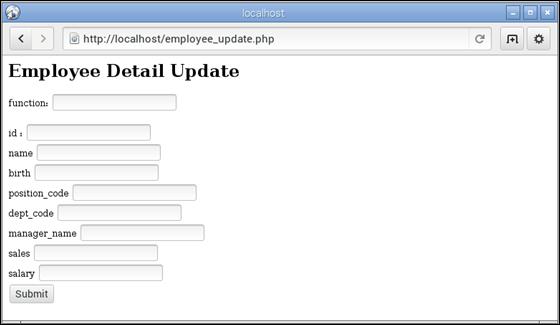
그림 24‑11 PHP Web 사례- "Employee List"
● database table 자료 조회
여기서는 앞에서 생성된 "$mysqli" object를 이용하여 database table에서 자료를 조회하는 작업을 한다.
먼저 table에서 자료를 읽는다. table에서 자료를 읽기 위한 SQL 문에는 다음과 같은 SELECT 문을 사용한다.
| select * from employee |
다음은 table에서 자료를 조회하는 작업이다.
| <?php $select_sql = "elect * from employee" ; $result = $mysqli->query ($select_sql); ?> |
위와 같은 SELECT SQL문장을 이용하여 "$mysql->query( )"를 실행하면 지정된 table에서 자료를 읽어서 되돌려주고, 그 자료가 "$result" object에 저장된다.
● table 자료 처리
다음은 조회한 자료를 하나씩 table layout으로 출력하는 것이다. 이 부분은 HTML <table> tag 내부에 들어가야 할 부분이다. "$result" object에 있는 자료를 하나씩 읽어서 "$row" object에 저장한 다음, 한 column씩 자료를 읽어서 <td> tag를 이용하여 출력한다.
| <?php while ($row = $result->fetch_assoc()) { print "<tr>" ; print "<td>".$row[ "id" ]."</td>" ; print "<td>".$row[ "name" ]."</td>" ; print "<td>".$row[ "birth" ]."</td>" ; print "<td>".$row[ "position_code" ]."</td>" ; print "<td>".$row[ "dept_code" ]."</td>" ; print "<td>".$row[ "manager_name" ]."</td>" ; print "<td>".$row[ "sales" ]."</td>" ; print "<td>".$row[ "salary" ]."</td>" ; print "</tr>" ; } ?> |
● 자료 조회 script 종합
아래는 지금까지 검토한 모든 script 들을 "employee_list.php"에 하나로 통합한 것이다.
| <!DOCTYPE html> <html> <head> <title> Handling Employee Information By MySQL and PHP </title> <style> table, th, td { border: 1px solid black; border-collapse: collapse; } th, td { padding: 5px; } </style> </head> <body> <h1>Employee List</h1> //connect database <?php $mysqli = new mysqli('localhost', 'pi', 'xxxxxx', 'raspi_db'); if ($mysqli->connect_error) { die('Connect Error (' . $mysqli->connect_errno . ') '. $mysqli->connect_error); } echo 'Success... ' . $mysqli->host_info . "\n"; ?> <table> <!-- table의 header --> <tr> <th>id </th> <th>name </th> <th>birth </th> <th>position_code </th> <th>dept_code </th> <th>manager_name </th> <th>sales </th> <th>salary </th> </tr> // select data from database table <?php $select_sql = "elect * from employee" ; $result = $mysqli->query ($select_sql); if (!$result) { die('Invalid query: ' . mysql_error()); } printf("Select returned %d rows.\n", $result->num_rows); ?> // table data content <?php while ($row = $result->fetch_assoc()) { print "<tr>" ; print "<td>".$row[ "id" ]."</td>" ; print "<td>".$row[ "name" ]."</td>" ; print "<td>".$row[ "birth" ]."</td>" ; print "<td>".$row[ "position_code" ]."</td>" ; print "<td>".$row[ "dept_code" ]."</td>" ; print "<td>".$row[ "manager_name" ]."</td>" ; print "<td>".$row[ "sales" ]."</td>" ; print "<td>".$row[ "salary" ]."</td>" ; print "</tr>" ; } ?> </table>
<?php $mysqli->close( ) ; ?> </body> </html> |
24.4.12.5 database table 자료 수정 script 작성
여기서는 database의 "employee" table에 있는 자료를 변경하는 script를 작성하도록 한다.
● form 준비
다음과 같은 기본적인 HMTL을 작성하여 "employee_update.php"에 저장한다.
| <!DOCTYPE html> <html> <head> <title> Handling Employee Information By MySQL and PHP </title> </head>
<body> <h1>Employee Detail Update</h1> <form action="employee_update.php" method="POST"> function: <input type="text" name="function" /> <br /><br />
id : <input type="text" name="id" /> <br /> name <input type="text" name="name" /> <br /> birth <input type="text" name="birth" /> <br /> position_code <input type="text" name="position_code" /> <br /> dept_code <input type="text" name="dept_code" /> <br /> manager_name <input type="text" name="manager_name" /> <br /> sales <input type="text" name="sales" /> <br /> salary <input type="text" name="salary" /> <br />
<input type="submit" /> </ form>
</body> </html> |
여기서는 <form> tag를 이용하여 입력에 필요한 양식을 정의한다. form을 정의할 때 "action"에는 해당 script 파일 이름을 그대로 지정하고, "method"에는 POST 방식을 지정하고 있다.
form에는 database table의 각 column에 대해서 자료를 입력할 수 있는 <input> tag가 포함되어 있다. 마지막에는 form 자료를 web server로 전송하는데 사용되는 "submit" button <input> tag도 정의하고 있다.
form의 내부에는 이 form으로 database에서 할 작업을 입력받기 위해서 "function"이라는 <input> tag가 만들어져 있다. 여기서 지정한 값에 따라 database table에서 처리할 변경 작업의 종류가 다음과 같이 결정될 것이다.
■ insert -- table에 자료를 추가한다.
■ update -- table에 자료를 수정한다.
■ delete -- table에 자료를 삭제한다.
해당 script를 실행하면 다음과 같은 화면이 표시된다.

그림 24‑12 PHP Web 사례- "Employee Detail Update"
● table update 처리
table자료를 insert 할 때 다음과 같은 형식의 SQL 문장을 사용한다.
| INSERT INTO employee SET name = "John" , birth = "1960-05-17", position_code = "11111", dept_code = "E1000", manager_name = "Mike", sales = "300000", salary = "600000" |
table을 update할 때 다음과 같은 형식의 SQL 문장을 사용한다.
| update employee SET name = "John" , birth = "1960-05-17" , position_code = "11111" , dept_code = "E1000" , manager_name = "Mike" , sales = "300000" , salary = "600000" where id = 1 ; |
table자료를 삭제할 때 다음과 같은 형식의 SQL 문장을 사용한다.
| delete employee where id = 3 |
다음은 table에 있는 자료를 수정하는 PHP 문장이다. "insert", "update", "delete" 각각에 대해서 함수를 정의하고, form에서 입력한 "function" 값에 따라서 필요한 처리를 하도록 하였다.
| // main processing If (isset( $_POST["function"] ) ) { switch ( $_POST["function"] ) { case "insert": employee_insert() ; break; case "update": employee_update() ; break; case "delete": employee_insert() ; break; default: echo "function is incorrect"; } }
// define insert table function function employee_insert () { $update_sql = " INSERT INTO employee "; $update_sql = $update_sql." name = ’".$_POST["name"]."’ , " ; $update_sql = $update_sql." birth = ’".$_POST["birth"]."’ , " ; $update_sql = $update_sql." position_code = ’".$_POST["position_code"]."’ , " ; $update_sql = $update_sql." dept_code = ’".$_POST["dept_code"]."’ , " ; $update_sql = $update_sql." manager_name = ’".$_POST["manager_name"]."’ , " ; $update_sql = $update_sql." sales = ’".$_POST["sales"]."’ , " ; $update_sql = $update_sql." salary = ’".$_POST["salary"]."’ " ;
if ($mysqli->query($update_sql) === TRUE) { echo "insert successfully"; } else { echo "insert error: " . $conn->error; } }
// define update table function function employee_update () { $update_sql = "DELETE employee SET "; $update_sql = $update_sql." name = ’".$_POST["name"]."’ , " ; $update_sql = $update_sql." birth = ’".$_POST["birth"]."’ , " ; $update_sql = $update_sql." position_code = ’".$_POST["position_code"]."’ , " ; $update_sql = $update_sql." dept_code = ’".$_POST["dept_code"]."’ , " ; $update_sql = $update_sql." manager_name = ’".$_POST["manager_name"]."’ , " ; $update_sql = $update_sql." sales = ’".$_POST["sales"]."’ , " ; $update_sql = $update_sql." salary = ’".$_POST["salary"]."’ , " ; $update_sql = $update_sql." WHERE id = ’".$_POST["id"]."’ " ;
if ($mysqli->query($update_sql) === TRUE) { echo "update successfully"; } else { echo "update error: " . $conn->error; } }
// define delete table function function employee_delete () { $update_sql = "DELETE employee "; $update_sql = $update_sql." WHERE id = ’".$_POST["id"]."’ " ;
if ($mysqli->query($update_sql) === TRUE) { echo "delete successfully"; } else { echo "delete error : " . $conn->error; } } |
● table 자료 변경 script 종합
아래는 지금까지 검토한 모든 script들을 "employee_update.php"에 하나로 통합한 것이다.
| <!DOCTYPE html> <html> <head> <title> Handling Employee Information By MySQL and PHP </title> </head> <body> <h1>Employee Detail Update</h1>
<?php $mysqli = new mysqli('localhost', 'pi', 'xxxxxx', 'raspi_db'); if ($mysqli->connect_error) { die('Connect Error (' . $mysqli->connect_errno. ') '. $mysqli->connect_error); } echo 'Success... ' . $mysqli->host_info . "\n"; ?>
<form action="employee_update.php" method="POST"> function: <input type="text" name="function" /> <br /> <br /> id : <input type="text" name="id" /> <br /> name <input type="text" name="name" /> <br /> birth <input type="text" name="birth" /> <br /> position_code <input type="text" name="position_code" /> <br /> dept_code <input type="text" name="dept_code" /> <br /> manager_name <input type="text" name="manager_name" /> <br /> sales <input type="text" name="sales" /> <br /> salary <input type="text" name="salary" /> <br /> <input type="submit" /> </ form>
// main processing If (isset( $_POST["function"] ) ) { switch ( $_POST["function"] ) { case "insert": employee_insert() ; break; case "update": employee_update() ; break; case "delete": employee_insert() ; break; default: echo "function is incorrect"; } }
// close database connection <?php $mysqli->close( ) ; ?>
// define insert table function function employee_insert () { $update_sql = " INSERT INTO employee "; $update_sql = $update_sql." name = '".$_POST["name"]."' , " ; $update_sql = $update_sql." birth = '".$_POST["birth"]."' , " ; $update_sql = $update_sql." position_code = '".$_POST["position_code"]."' , " ; $update_sql = $update_sql." dept_code = '".$_POST["dept_code"]."' , " ; $update_sql = $update_sql." manager_name = '".$_POST["manager_name"]."' , " ; $update_sql = $update_sql." sales = '".$_POST["sales"]."' , " ; $update_sql = $update_sql." salary = '".$_POST["salary"]."' " ;
if ($mysqli->query($update_sql) === TRUE) { echo "insert successfully"; } else { echo "insert error: " . $conn->error; } }
// define update table function function employee_update () { $update_sql = "DELETE employee SET "; $update_sql = $update_sql." name = '".$_POST["name"]."' , " ; $update_sql = $update_sql." birth = '".$_POST["birth"]."' , " ; $update_sql = $update_sql." position_code = '".$_POST["position_code"]."' , " ; $update_sql = $update_sql." dept_code = '".$_POST["dept_code"]."' , " ; $update_sql = $update_sql." manager_name = '".$_POST["manager_name"]."' , " ; $update_sql = $update_sql." sales = '".$_POST["sales"]."' , " ; $update_sql = $update_sql." salary = '".$_POST["salary"]."' , " ; $update_sql = $update_sql." WHERE id = '".$_POST["id"]."' " ;
if ($mysqli->query($update_sql) === TRUE) { echo "update successfully"; } else { echo "update error: " . $conn->error; } }
// define delete table function function employee_delete () { $update_sql = "DELETE employee "; $update_sql = $update_sql." WHERE id = '".$_POST["id"]."' " ;
if ($mysqli->query($update_sql) === TRUE) { echo "delete successfully"; } else { echo "delete error : " . $conn->error; } }
</body> </html> |
24.4.12.6 database table "employee" 관리 화면 진행 흐름