Published Book on Amazon
| All of IOT Starting with the Latest Raspberry Pi from Beginner to Advanced – Volume 1 | |
| All of IOT Starting with the Latest Raspberry Pi from Beginner to Advanced – Volume 2 |
출판된 한글판 도서
| 최신 라즈베리파이(Raspberry
Pi)로 시작하는 사물인터넷(IOT)의 모든 것 – 초보에서 고급까지 (상) |
|
| 최신 라즈베리파이(Raspberry
Pi)로 시작하는 사물인터넷(IOT)의 모든 것 – 초보에서 고급까지 (하) |
Original Book Contents
4.5.3 Function of <NOOBS> Utility
4.5.3.1 Starting <NOOBS> Utility
When everything is ready to use the <NOOBS> utility, connect the power cable to the Raspberry Pi and turn on the power, then the <NOOBS> utility program starts automatically.
4.5.3.2 Rainbow Color Screen of <NOOBS> Utility
When the <NOOBS> utility program starts, the rainbow color pattern screen appears first as shown below. These rainbow color screens appear slightly different depending on the monitor type and resolution.

Figure 4‑6 Rainbow color pattern of <NOOBS> utility
4.5.3.3 Booting Screen of <NOOBS> Utility
After the rainbow color screen appears, wait a few moments and the <NOOBS> utility booting screen appears. This screen is always displayed when you start the <NOOBS> utility program, not just when you install the operating system for the first time, but also when booting the operating system.

Figure 4‑7 Boot screen of <NOOBS> utility
4.5.3.4 Installation Screen of <NOOBS> Utility
If you do not have the operating system installed, wait a little longer and you will see a screen showing the list of operating systems to install as shown below. You can start installing the desired operating system here.
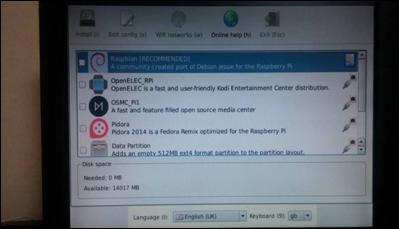
Figure 4‑8 Installation screen of <NOOBS> utility
4.5.3.5 Function of Button on <NOOBS> Utility Screen
The functions of the buttons on the screen are as follows:
■ Install
Start the installation for the selected operating system.
■ Edit config
|
|

Figure 4‑9 Configuration of <NOOBS> utility
Here you can adjust the system configuration items. You can edit the contents of config.txt and the contents of cmdline.txt. Note that you can not use it for an operating system that is not installed yet, and you can edit it to adjust what you need before booting for a system that is already installed.
The config.txt file contains settings for items such as HDMI Safe mode, HDMI group, HDMI mode, HDMI signal, Composite PAL, overscan, overclock, and libr-rpi modules.
The cmdline.txt file contains settings for items such as console, root location, root file type, etc.
The configuration you set here is stored in the following file in the actual installed operating system:
ü config.txt -- /boot/config.txt
ü cmdline.txt -- /boot/cmdline.txt
■ Wi-Fi network
In the Raspberry Pi 3 model, Wi-Fi function is installed as basic hardware function. In the latest Raspbian version, Wi-Fi is available in the installation process of operating system.
Depending on the type of the <NOOBS utility and the operating system that is installed, you may need to connect to Internet during the installation process. If you can not use a wired LAN connection, you can use a wireless connection. Here you can set up a Wi-Fi connection to use the Wi-Fi.
■ Online Help
An internet browser will display a screen that provides help on the Raspberry Pi system. Specifically, contents of the following URL are displayed:
https://www.raspberrypi.org/downloads/noobs/
■ Exit
The system proceeds to step booting the already installed operating system.
4.5.3.6 What If <NOOBS> Utility Screen is invisible
If you connect the power to install operating system on Raspberry Pi the first, or restart the <NOOBS> utility program after the operating system is installed, the <NOOBS> utility config screen automatically appears. However, there may be cases where the <NOOBS> utility config screen should appear but the screen does not appear.
This happens because the monitor settings of the <NOOBS> utility do not match the actual monitors connected to Raspberry Pi. The <NOOBS> utility does not support automatic configuration for all kinds of monitors, so it does not work normally in some cases.
If the connected monitor does not work properly, press the numeric buttons 1 - 4 on the keyboard and check if the screen is visible. When you press the number buttons 1-4, the monitor settings of the <NOOBS> utility are set to the following modes:
■ 1. Default HDMI Mode -- When using HDMI output
■ 2. HDMI Safe Mode -- When using HDMI output and (1) does not work
■ 3. Composite PAL Mode -- When using Composite output
■ 4. Composite NTSC Mode -- When using Composite output and (1) does not work