Raspberry Pi_Eng_09.8.1 Enabling Raspberry Pi Camera – RealOmega – Publishing
Skip to content
  • Top

RealOmega - Publishing

Homepage
  • Welcome
  • Company
    • Company Business
    • Company Profile
  • Publishing
    • Overview
  • Book Summary
    • Book List
    • Book Review
      • Book Review – All of the IOT Starting with Latest Raspberry Pi from Beginner to Advanced
      • Book Review – 최신 Raspberry Pi로 시작하는 IOT의 모든 것 – 초보에서 고급까지
      • Book Review – ERP SAP R/3 ALE, EDI & IDOC 기술
  • Book Content
    • RaspberryPi
      • RaspberryPi-English
      • RaspberryPi-Korea
    • SAP ALE/IDOC
      • SAP ALE/IDOC-English
      • SAP ALE/IDOC-Korea

Raspberry Pi_Eng_09.8.1 Enabling Raspberry Pi Camera

Posted on July 25, 2017September 20, 2017 by realomega


Published Book on Amazon


All of IOT Starting with the Latest Raspberry Pi from Beginner to Advanced – Volume 1
All of IOT Starting with the Latest Raspberry Pi from Beginner to Advanced – Volume 2


출판된 한글판 도서


최신 라즈베리파이(Raspberry Pi)로 시작하는 사물인터넷(IOT)의 모든 것 – 초보에서 고급까지 (상)
최신 라즈베리파이(Raspberry Pi)로 시작하는 사물인터넷(IOT)의 모든 것 – 초보에서 고급까지 (하)


Original Book Contents


9.8   Setting Camera and Audio Device


This section describes the environment configuration of the camera and audio device installed in the system:


■   Enabling Raspberry Pi camera

To use Raspberry Pi dedicated camera that is connected to the CSI port of Raspberry Pi, you need to activate the corresponding camera function through setting.


■   Adjusting audio output method

In Raspberry Pi, the audio output can be sent to the audio jack or to the HDMI Terminal. This setting specifies how audio output is handled.
The following options are available
:

■    Auto

■    Force 3.5mm ('headphone') jack

■    Force HDMI      


9.8.1     Enabling Raspberry Pi Camera


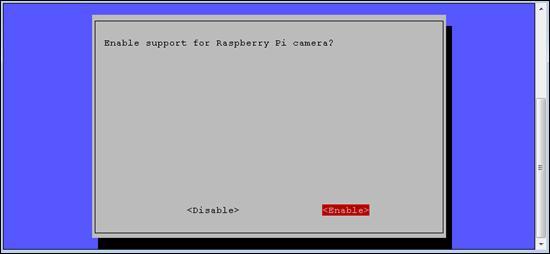
If you want to activate the Raspberry Pi camera, use [Enable Camera] item on the menu screen. Move to the item by the [Arrow] button, select it, and press the [Enter] button.


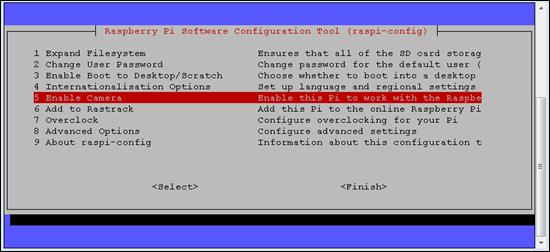
Figure 9‑13 Enabling Raspberry Pi camera in "raspi-config" command


This starts the next screen where you select the required items. Activate the camera by pressing the [Enable] button. When the setting is completed, the screen returns to the previous screen.


RaspberryPi-English"raspi-config" Command, apache, debian, Default User Account "pi", interface, iot, linux, mysql, php, raspberry pi, Raspberry Pi Camera, raspbian, sensor, System configuration

Post navigation

Previous
Next

Book Content

  • RaspberryPi
    • RaspberryPi-Korea
    • RaspberryPi-English
  • SAP ALE/IDOC
    • SAP ALE/IDOC-Korea
    • SAP ALE/IDOC-English

Search Post

Recent Posts

  • RaspberryPi-Korea – Post List
  • RaspberryPi-English – Post List
  • SAP ALE/IDOC-Korea – Post List
  • SAP ALE/IDOC-English- Post List
  • SAP ALE IDOC EDI-Kor_10.2.2 File Transfer Protocol(FTP)
April 2023
M T W T F S S
« May    
 12
3456789
10111213141516
17181920212223
24252627282930

리얼오메가 컨설팅(유). 사업자 등록번호 : 122-81-67479. 주소 : 07328 서울시 영등포구 여의도동 국제금융로 6길 30 백상빌딩.
Phone : 070-8260-2560. Fax : 02-783-0402. E-Mail : manager@realomega.com

© RealOmega - Publishing 2023