Published Book on Amazon
| All of IOT Starting with the Latest Raspberry Pi from Beginner to Advanced – Volume 1 | |
| All of IOT Starting with the Latest Raspberry Pi from Beginner to Advanced – Volume 2 |
출판된 한글판 도서
| 최신 라즈베리파이(Raspberry Pi)로 시작하는 사물인터넷(IOT)의 모든 것 – 초보에서 고급까지 (상) | |
| 최신 라즈베리파이(Raspberry Pi)로 시작하는 사물인터넷(IOT)의 모든 것 – 초보에서 고급까지 (하) |
Original Book Contents
22.1.3 Taking Picture and Video Using Pi Camera
22.1.3.1 Overview of Shooting Command for Pi Camera
With Raspberry Pi's dedicated camera, you can run the following commands. They have functions that can shoot a still image or take a movie according to a command.
■ "raspistill" command
. This command captures still images. The captured image is saved as "jpg" file.
■ "raspiyuv" command
This command captures still images. This command does not use an encoder, but directly sends the YUV or RGB output from the camera component to a file.
■ "raspivid" command
This command records a movie. The captured data is stored in a file in "H.264" format.
All commands are available in the Shell and are designed to use the MMAL API. All commands use four OpenMAX (MMAL) components: "camera", "preview", "encoder" and "null_sink". First, all commands use "camera" component. "raspistill" command uses "Image Encoder" component, "raspivid" command uses "Video Encoder" component, and "raspiyuv" command does not use "encoder" component and sends YUV or RGB output from "camera" component directly to a file.
"preview" screen is optional and can be used as a full screen or a square of a certain size. If "preview" is disabled, "null_sink" component is used to absorb the contents of the "preview" frame. As the "preview" frame is used to calculate the exposure or white balance settings, it is necessary for the camera to produce "preview" frames even if it is not necessary.
22.1.3.2 Taking Pictures with "raspistill" Command
To take a picture using the Raspberry Pi camera, "raspistill" command can be used as follows.
[Command Format]
| raspistill [option] |
[Command Overview]
■ This takes pictures with Raspberry Pi camera.
■ User privilege -- Normal user.
[Detail Description]
■ When you start to take a picture, preview screen will be displayed for the scenery to be taken for a certain period of time. When the time is over, it is saved as a file.
■ This program basically stores the pictures in a file as "jpg" format. If necessary, you can convert to another format using the encoder.
[Main option]
■ control option
| -?, --help | : This help information |
| -w, --width | : Set image width <size> |
| -h, --height | : Set image height <size> |
| -q, --quality | : Set jpeg quality <0 to 100> |
| -o, --output | : Output filename <filename> (to write to stdout, use '-o -'). If not specified, no file is saved |
| -d, --demo | : Run a demo mode (cycle through range of camera options, no capture) |
| -v, --verbose | : Output verbose information during run |
| -t, --timeout | : Time (in ms) before takes picture and shuts down (if not specified, set to 5s) |
| -e, --encoding | : Encoding to use for output file (jpg, bmp, gif, png) |
| -tl, --timelapse | : Timelapse mode. Takes a picture every <t>ms |
| -set, --settings | : Retrieve camera settings and write to stdout |
■ Preview option
| -p, --preview | : Preview window settings <'x,y,w,h'> |
| -f, --fullscreen | : Fullscreen preview mode |
| -op, --opacity | : Preview window opacity (0-255) |
| -n, --nopreview | : Do not display a preview window |
[Used Example]
Here, we will take a picture of the still state as follows.
| pi@raspberrypi ~/Image_Camera $ raspistill -v -o test_snap1.jpg |
| raspistill Camera App v1.3.8
Width 2592, Height 1944, quality 85, filename test_snap1.jpg Time delay 5000, Raw no Thumbnail enabled Yes, width 64, height 48, quality 35 Link to latest frame enabled no Full resolution preview No Capture method : Single capture
Preview Yes, Full screen Yes Preview window 0,0,1024,768 Opacity 255 Sharpness 0, Contrast 0, Brightness 50 Saturation 0, ISO 0, Video Stabilisation No, Exposure compensation 0 Exposure Mode 'auto', AWB Mode 'auto', Image Effect 'none' Metering Mode 'average', Colour Effect Enabled No with U = 128, V = 128 Rotation 0, hflip No, vflip No ROI x 0.000000, y 0.000000, w 1.000000 h 1.000000 Camera component done Encoder component done Starting component connection stage Connecting camera preview port to video render. Connecting camera stills port to encoder input port Opening output file test_snap1.jpg Enabling encoder output port Starting capture 0 Finished capture 0 Closing down Close down completed, all components disconnected, disabled and destroyed |
Using "-v" option just like the above, you can see various system information about the photo shoot. It shows information about various conditions applied when taking pictures, and shape and quality of the preview.
When the specified preview time elapses, the contents of the picture are saved as a file. The size of the picture is determined by the size specified in "width" and "height", and the precision is determined according to the specified "quality".
| pi@raspberrypi ~/Image_Camera $ ls -l |
| total 2736 -rw-r--r-- 1 pi pi 2799282 May 13 14:06 test_snap1.jpg |
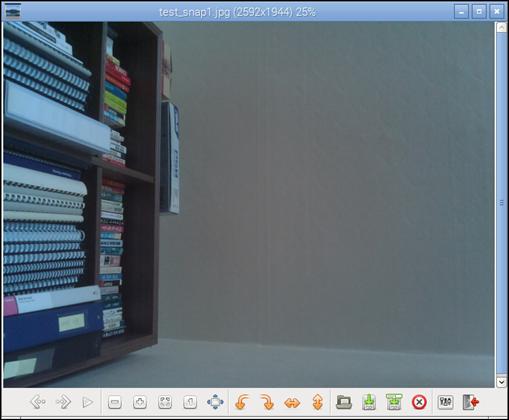
You can view the contents of the picture by using [Image Viewer] in [File manager] of Desktop GUI window.

Figure 22‑2 Using [Image Viewer] in [File Manager] of Desktop window
The following is viewing the contents of the picture in [Image Viewer].
22.1.3.3 Recording Video Using "raspivid" Command
To shoot a movie using a Raspberry Pi camera, "raspivid" command can be used as follows.
[Command Format]
| raspivid [option] |
[Command Overview]
■ This takes a movie using Raspberry Pi camera.
■ User privilege -- Normal user.
[Detail Description]
■ When you start movie recording, preview screen is displayed for the scenery to be taken for the specified time, and it is saved in a file at the same time.
■ This program basically stores video in file of "H.264" format.
[Main option]
■ Control option
| -?, --help | : This help information |
| -w, --width | : Set image width <size>. Default 1920 |
| -h, --height | : Set image height <size>. Default 1080 |
| -b, --bitrate | : Set bitrate. Use bits per second (e.g. 10MBits/s would be -b 10000000) |
| -fps, --framerate | : Specify the frames per second to record |
| -pf, --profile | : Specify H264 profile to use for encoding |
| -o, --output | : Output filename <filename> (to write to stdout, use '-o -'). If not specified, no file is saved |
| -d, --demo | : Run a demo mode (cycle through range of camera options, no capture) |
| -v, --verbose | : Output verbose information during run |
| -t, --timeout | : Time (in ms) to capture for. If not specified, set to 5s. Zero to disable |
| -td, --timed | Cycle between capture and pause. -cycle on,off where on is record time and off is pause time in ms |
| -set, --settings | : Retrieve camera settings and write to stdout |
■ Preview option
| -p, --preview | : Preview window settings <'x,y,w,h'> |
| -f, --fullscreen | : Fullscreen preview mode |
| -op, --opacity | : Preview window opacity (0-255) |
| -n, --nopreview | : Do not display a preview window |
[Used Example]
Here, we will take a video as follows.
| pi@raspberrypi ~/Image_Camera $ raspivid -v -t 5000 -o test_motion1.h264 |
| raspivid Camera App v1.3.12
Width 1920, Height 1080, filename test_motion1.h264 bitrate 17000000, framerate 30, time delay 5000 H264 Profile high H264 Quantisation level 0, Inline headers No H264 Intra refresh type (null), period -1
~ ~ Skip ~
Exposure Mode 'auto', AWB Mode 'auto', Image Effect 'none' Metering Mode 'average', Colour Effect Enabled No with U = 128, V = 128 Rotation 0, hflip No, vflip No ROI x 0.000000, y 0.000000, w 1.000000 h 1.000000 Camera component done Encoder component done Starting component connection stage Connecting camera preview port to preview input port Starting video preview Connecting camera stills port to encoder input port Opening output file "test_motion1.h264" Enabling encoder output port Starting video capture Finished capture Closing down Close down completed, all components disconnected, disabled and destroyed |
Using "-v" option just like the above, you can see various system information about movie shooting. It shows various conditions applied when shooting video or information about the shape and quality of the video.
After the specified preview time elapses, the content of the video is saved to the file. The size of the video is determined by the size specified by "width" and "hight", and the precision is determined according to the specified "quality".
| pi@raspberrypi ~/Image_Camera $ ls -l |
| -rw-r--r-- 1 pi pi 10130926 May 13 15:21 test_motion1.h264 |