Published Book on Amazon
| All of IOT Starting with the Latest Raspberry Pi from Beginner to Advanced – Volume 1 | |
| All of IOT Starting with the Latest Raspberry Pi from Beginner to Advanced – Volume 2 |
출판된 한글판 도서
| 최신 라즈베리파이(Raspberry Pi)로 시작하는 사물인터넷(IOT)의 모든 것 – 초보에서 고급까지 (상) | |
| 최신 라즈베리파이(Raspberry Pi)로 시작하는 사물인터넷(IOT)의 모든 것 – 초보에서 고급까지 (하) |
Original Book Contents
22.2.2 <MUTT> Program - Mail Transmitting Auxiliary Tool
As described in the previous section, ff you have only <SSMTP> mail transport agent, you can send mail, but there are many inconveniences. When sending mail from the Shell, we have to enter a sender, a recipient, a body of the mail, etc. in the mail contents at once, and we can not transmit an attachment file.
● Installing and setting up <MUTT> program
There is an email transmission tool that solves this inconvenience, that is, <MUTT> program.
To install this program, run the following command
| sudo apt-get install mutt |
In order to use the program, it is necessary to set it in advance. The configuration is usually done by creating a hidden file ".muttrc" in the logon user's home directory. Edit the file using a text file editor.
There are various setting items for <MUTT> program. For further explanation, refer to the following.
■ https://blog.bartbania.com/raspberry_pi/consolify-your-gmail-with-mutt/
<MUTT> program have the function to send mail to SMTP server through MTA (Mail Transfer Agent) on the local computer. The following is a setting for sending mail through <SSMTP> Mail Transfer Agent installed on the local computer.
| # SMTP SETTINGS – Local Server set sendmail="/usr/sbin/ssmtp" |
However, <MUTT> program can send mail by connecting directly to SMTP server at remote. Below is showing an example of the settings needed at that time.
| # SMTP SETTINGS – Remote Server set smtp_url = 'smtp://kim.dueggyu@smtp.gmail.com:587/' set smtp_pass = 'password' # user password |
Various informations related to sending mail can be specified in the configuration file.
| # Mail Sender set from = 'kim.dueggyu@gmail.com' set realname = 'Kim.Dueg Gyu' |
● Sending E-Mail using <MUTT> program
When sending mail using <MUTT> program, execute the command in the following format.
[Command Format]
| mutt [options] <receiver-mail-address> |
[Command Overview]
■ This send an E-mail using <MUTT> program.
■ User privilege -- Normal user.
[Detail Description]
■ When you execute this command, a separate screen for inputting and transmitting specific contents of the mail is displayed. When you enter mail recipient, title, and mail body content and save it, a screen for final confirmation and sending appears. If you select sending task, it will go through the final sending process.
■ How to write simple mail
Using the format below, you can enter the body of the message at once in Shell.
| echo < mail-body> | mutt [options] <receiver-mail-address> |
If using input redirection function "<<", it is easier to input mail contents. Enter the contents from the next line of "EOF", enter "EOF" when input is complete, and press [Enter] to execute the command.
| mutt [options] <receiver-mail-address> << EOF <mail- body> EOF |
[Main option]
| -h | Display help. |
| -b address | Specify a blind-carbon-copy (BCC) recipient |
| -c address | Specify a carbon-copy (CC) recipient |
| -s subject | Specify the subject of the message. |
| -- | Treat remaining arguments as addr even if they start with a dash. See also "-a" above. Separator to distinguish from recipient of the mail when attached file |
| -a file [...]
| Attach a file to your message using MIME. When attaching single or multiple files, separating filenames and recipient addresses with "--" is mandatory, e.g. mutt -a image.jpg -- addr1 or mutt -a img.jpg *.png -- addr1 addr2. The -a option must be placed at the end of Shell options. |
[Used Example]
Next is sending a simple e-mail to another e-mail account via "gmail" from Raspberry Pi.
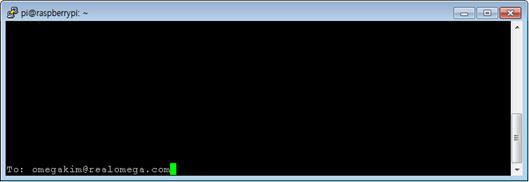
| pi@raspberrypi ~ $ mutt omegakim@realomega.com |
When you execute the above command, screens to input mail contents appear as follows. At first, a screen for entering the recipient of mail appears, and then a screen to enter the title appears.
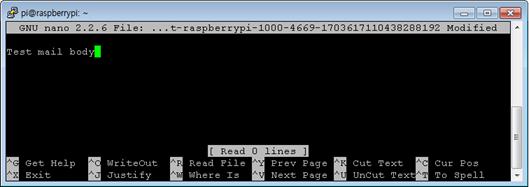
Next, the screen to enter the body of mail is displayed as shown below.
Finally, the final sending screen appears as shown below.
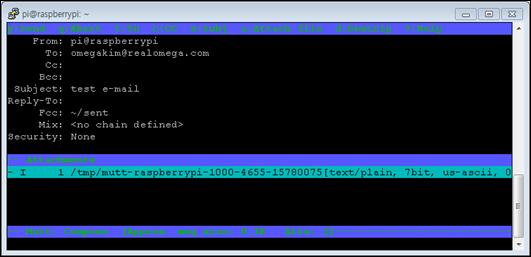
Figure 22‑6 Sending E-Mail using <MUTT> program
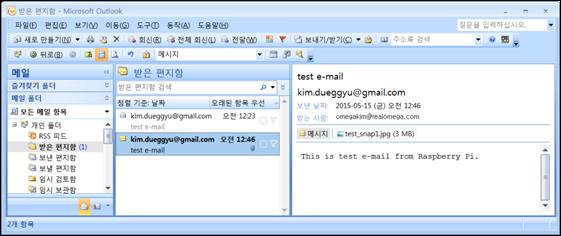
This time, we will attach "/Image_Camera/"test_snap1.jpg" file in the home directory of the "pi" account while entering all the contents in Shell. Here, the body is entered with "echo" command and then passed to <MUTT> program through "pipe".
| pi@raspberrypi ~ $ echo "This is test e-mail from Raspberry Pi." | mutt -s "test e-mail" –a ~/Image_Camera/test_snap1.jpg -- omegakim@realomega.com |
The following is confirming an E-mail of receipient on outlook. You can see that an E-mail sent from "gmail" is received and a file is attached to the E-mail.