Published Book on Amazon
| All of IOT Starting with the Latest Raspberry Pi from Beginner to Advanced – Volume 1 | |
| All of IOT Starting with the Latest Raspberry Pi from Beginner to Advanced – Volume 2 |
출판된 한글판 도서
| 최신 라즈베리파이(Raspberry Pi)로 시작하는 사물인터넷(IOT)의 모든 것 – 초보에서 고급까지 (상) | |
| 최신 라즈베리파이(Raspberry Pi)로 시작하는 사물인터넷(IOT)의 모든 것 – 초보에서 고급까지 (하) |
Original Book Contents
24.3.2 Installing <Apache Web Server>
24.3.2.1 Installing <Apache Web Server>
When installing <Apache web server> on Raspberry Pi, use the following command:
| sudo apt-get install apache2 |
Next is verifying that the related process is running normally after <Apache web server> installation is complete.
| pi@raspberrypi ~ $ ps -ef | grep apache |
| root 14034 1 0 22:33 ? 00:00:00 /usr/sbin/apache2 -k start www-data 14037 14034 0 22:33 ? 00:00:00 /usr/sbin/apache2 -k start www-data 14039 14034 0 22:33 ? 00:00:00 /usr/sbin/apache2 -k start www-data 14040 14034 0 22:33 ? 00:00:00 /usr/sbin/apache2 -k start pi 14120 12889 0 22:34 pts/2 00:00:00 grep --color=auto apache |
Now that <Apache web server> is installed, we will check if it is working properly. To do this, you should try to connect to the web server from web browser.
To access the web server, you need to know IP address of the web server. You can use "ifconfig" command to find IP address specified for Raspberry Pi.
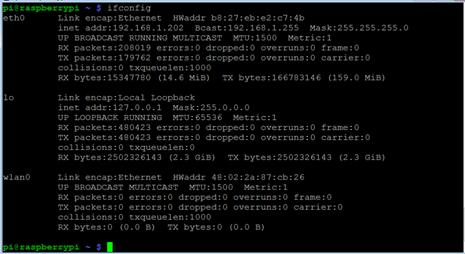
On the above screen, you can see the information about IP address specified for Raspberry Pi. IP address for "eth0" is specified "192.168.1.202" and IP address for "lo" is specified "127.0.0.1".
First, let's connect to the web server from Raspberry Pi inside. Open a web browser in the window of Raspberry Pi and connect to the web server. If you need IP address for Raspberry Pi itself in Raspberry Pi, you can use "127.0.0.1" which is the IP address of loopaback device "lo" which means Raspberry Pi itself, or you can use the name "localhost".
The following is connecting to the web server from Raspberry Pi inside.
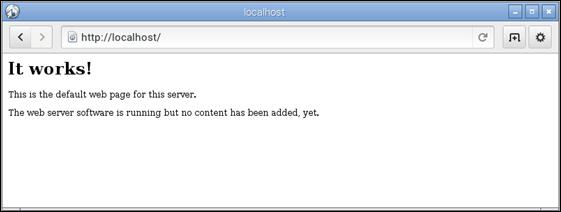
Figure 24‑2 Internal connection to Apache web server
This screen means that <Apache web server> installed in Raspberry Pi works properly for the request of the web browser connected internally.
Now let's try connecting from outside Raspberry Pi. When accessing from outside the Raspberry Pi system, you can use 192.168.1.202, the IP address specified in "eth0", which means "Ethernet".
The following is an example of connecting to a web server installed on Raspberry Pi from another computer with MS Windows installed on the same LAN network.
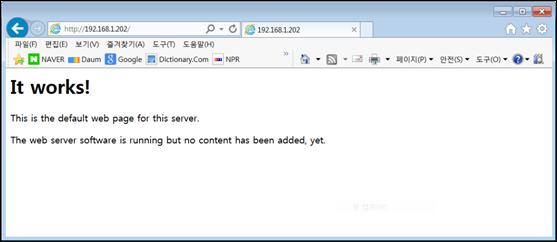
Figure 24‑3 External connection to Apache web server
You can see that the same screen as the previous internal connection appears in MS explorer. This screen shows that <Apache web server> is working properly.
24.3.2.2 Configuring Apache Server
Configuration files for Apache are in "/etc/apache2/" folder. There is a hierarchical relationship between the configuration files here, and the overall structure is as follows.


A list of major configuration files is shown below.
■ /etc/apache2/apache2.conf configuration file
■ /etc/apache2/ports.conf configuration file
■ /etc/apache2/./conf.d/ configuration file
■ ./mods-available/ configuration file
■ ./mods-enabled/ configuration file
■ *.load configuration file
■ *.conf configuration file
■ ./sites-available/ configuration file
■ / sites-enabled/ configuration file
● "/etc/apache2/apache2.conf" file
This file is the central configuration file of <Apache web server>. The following is an example for the contents of "/etc/apache2/apache2.conf" file. You can see that this file includes other configuration files.
| ~ Skip ~ Skip # ErrorLog: The location of the error log file. # If you do not specify an ErrorLog directive within a <VirtualHost> # container, error messages relating to that virtual host will be # logged here. If you *do* define an error logfile for a <VirtualHost> # container, that host's errors will be logged there and not here. # ErrorLog ${APACHE_LOG_DIR}/error.log
# # LogLevel: Control the number of messages logged to the error_log. # Possible values include: debug, info, notice, warn, error, crit, # alert, emerg. # LogLevel warn
# Include module configuration: Include mods-enabled/*.load Include mods-enabled/*.conf
# Include list of ports to listen on and which to use for name based vhosts Include ports.conf ~ Skip ~ Skip # Include generic snippets of statements Include conf.d/
# Include the virtual host configurations: Include sites-enabled/ |
● "/etc/apache2/ports.conf" file
This file defines the port used by <Apache web server>. One web site can be specified for a particular port. If necessary, multiple ports can be defined to operate multiple web sites.
Here is the content of "ports.conf" file
.
| # If you just change the port or add more ports here, you will likely also # have to change the VirtualHost statement in # /etc/apache2/sites-enabled/000-default # This is also true if you have upgraded from before 2.2.9-3 (i.e. from # Debian etch). See /usr/share/doc/apache2.2-common/NEWS.Debian.gz and # README.Debian.gz
NameVirtualHost *:80 Listen 80
<IfModule mod_ssl.c> # If you add NameVirtualHost *:443 here, you will also have to change # the VirtualHost statement in /etc/apache2/sites-available/default-ssl # to <VirtualHost *:443> # Server Name Indication for SSL named virtual hosts is currently not # supported by MSIE on Windows XP. Listen 443 </IfModule>
<IfModule mod_gnutls.c> Listen 443 </IfModule>
|
The above "NameVirtualHost" item defines one port. When you want to access a specific web site from the outside, you have to use the port that refers to the web site along with IP address of the web server. For each entry defined here, you must set the details for that web site in "VirtualHost" item in "./sites-enabled/000-default" file. In other words, the definitions are connected as follows.

● Files in "./mods-available/" and files in "./mods-enabled/"
These are where <Apache web server> contains module to load and contains the configuration that the module needs. However, there is usually almost no need to change the content.
"./mods-available/" folder is where to define necessary items, and if you want to enable and use it, you may put it in "./mods-enabled/" folder. The configuration files in "./mods-enabled/" folder are all link files that refer to the files of same name to contain settings in the "./mods-available/" folder.
● Files in "./sites-available/" and files in "/sites-enabled/"
These are where you set up specific details for each web site. They manage informations about the directory where HTML file used in the web site is managed and the location where the relevant CGI programs are managed.
"./ sites-available/" folder is where to define necessary items, and if you want to enable and use it, you may put it in "./sites-enabled/" folder. The configuration files in "./sites-enabled/" folder are all link files that refer to the file of same name to contain settings in "./sites-available/" folder.
Here is the content of "./sites-available/default" or "./sites-enabled/000-default" file.
| <VirtualHost *:80> ServerAdmin webmaster@localhost
DocumentRoot /var/www <Directory /> Options FollowSymLinks AllowOverride None </Directory> <Directory /var/www/> Options Indexes FollowSymLinks MultiViews AllowOverride None Order allow,deny allow from all </Directory>
ScriptAlias /cgi-bin/ /usr/lib/cgi-bin/ <Directory "/usr/lib/cgi-bin"> AllowOverride None Options +ExecCGI -MultiViews +SymLinksIfOwnerMatch Order allow,deny Allow from all </Directory>
ErrorLog ${APACHE_LOG_DIR}/error.log
# Possible values include: debug, info, notice, warn, error, crit, # alert, emerg. LogLevel warn
CustomLog ${APACHE_LOG_DIR}/access.log combined </VirtualHost> |
The above definition defines the contents of web site for port "80", and defines contents of "ServerAdmin", "DocumentRoot", "ScriptAlias", "ErrorLog", "LogLevel", "CustomLog" and so on. If you look at the definition of "DocumentRoot" in the configuration, "/var/www" is specified, which means that all the HTML data used in this web site is stored in "/var/www" folder.
If you look at the folder for HTML data, file "index.html" is saved as below.
| pi@raspberrypi ~ $ ls /var/www -l |
| -rw-r--r-- 1 root root 177 May 20 22:33 index.html |
If you check the file, the content is described using HTML tag as shown below.
| <html><body><h1>It works!</h1> <p>This is the default web page for this server.</p> <p>The web server software is running but no content has been added, yet.</p> </body></html> |
If you open this file in the window's web browser, the following screen will appear. You will see that this is the screen that appears earlier when we first connected to the web server after installing <Apache web server>.
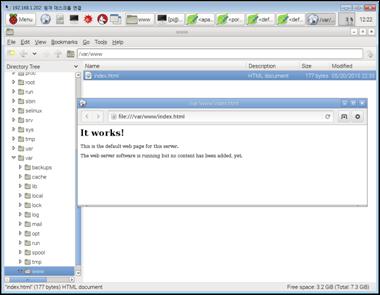
The above "index.html" file is a file that has a special meaning in the web site and is the first HTML file to be executed even though it is not specified at start of the web site.