Published Book on Amazon
| All of IOT Starting with the Latest Raspberry Pi from Beginner to Advanced – Volume 1 | |
| All of IOT Starting with the Latest Raspberry Pi from Beginner to Advanced – Volume 2 |
출판된 한글판 도서
| 최신 라즈베리파이(Raspberry Pi)로 시작하는 사물인터넷(IOT)의 모든 것 – 초보에서 고급까지 (상) | |
| 최신 라즈베리파이(Raspberry Pi)로 시작하는 사물인터넷(IOT)의 모든 것 – 초보에서 고급까지 (하) |
Original Book Contents
24.4.12 Simple PHP Web Page
We will here perform operations to query, input, modify, and delete data in MySQL by using PHP.
24.4.12.1 Preparing Main Document
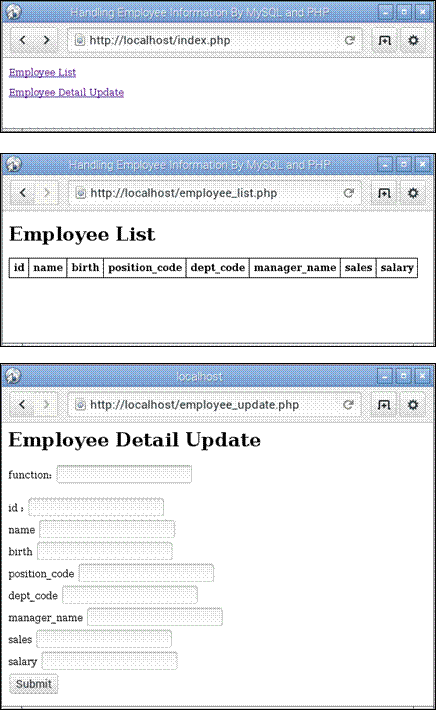
Create the document as follows and save it in "index.php" file.
| <!DOCTYPE html> <html> <head> <title> Handling Employee Information By MySQL and PHP </title> </head> <body> <p><a href=" /employee_list.php"> Employee List </a></p> <p><a href="/employee_update.php"> Employee Detail Update</a></p> </body> </html> |
In the above document, "/employee_list.php" script file is linked to the "Employee List" statement and "/employee_update.php" script file is linked to the "Employee Detail Update" statement.
If you run this file through a web browser, the following screen appears.
|
|
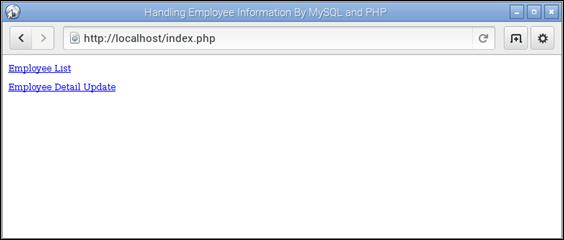
Figure 24‑10 PHP Web example - starting screen of main document
This is the document for the main starting screen for future work. If you click "Employee List" on this screen, you will go to the web page which inquires the data from "employee" table of the database. If you click "Employee Detail Update", you will go to the web page screen which changes the data of "employee" table of the database. .
24.4.12.2 Preparing Works for Database and Table
The database used here will use the database and table used to explain MySQL earlier. The details are as follows.
■ database -- raspi_db
■ table -- employee
■ id -- INT -- PRIMARY KEY, AUTO_INCREMENT
■ name -- VARCHAR(50)
■ birth -- DATE
■ position_code -- CHAR(10)
■ dept_code -- CHAR(10)
■ manager_name -- VARCHAR(50)
■ sales -- DECIMAL(10,0)
■ salary_rate -- NUMERIC(6,2)
24.4.12.3 Connecting and Disconnecting Database
● Connecting to database
Here we will connect to the database using <mysqli> extension. The following information is required for database connection.
■ host name -- localhost
This can be assigned an IP address or a URL to the host. Here "localhost" is used because MySQL is installed on the same server.
■ user -- pi
■ password -- xxxxxx
■ database -- raspi_db
First, create a "mysqli" object to connect to the MySQL database as shown below.
| <?php $mysqli = new mysqli('localhost', 'pi', 'xxxxxx', 'raspi_db');
echo 'Success... ' . $mysqli->host_info . "\n";
?> |
Here we create a "mysqli" object and store it in "$mysqli" variable. When the object is created, it tries to connect to the MySQL database internally. If the connection is successfully completed, all the connection related information is stored in "$mysqli" variable. The object stored in "$mysqli" variable handles all future work with MySQL.
● Terminating connection to database
If all processing for the database is finished, the connection to the database is terminated. It can be processed as follows.
| <?php $mysqli->close( ) ; ?> |
24.4.12.4 Writing script to Query Data in Database Table
Here, we will create a script that queries the data in "employee" table of the database.
● Writing a basic HTML and table layout
Create a PHP file with the following HMTL contents and store it in "employee_list.php".
| <!DOCTYPE html> <html> <head> <title> Handling Employee Information By MySQL and PHP </title> <style> table, th, td { border: 1px solid black; border-collapse: collapse; } th, td { padding: 5px; } </style> </head>
<body> <h1>Employee List</h1> <table> <!-- table의 header --> <tr> <th>id </th> <th>name </th> <th>birth </th> <th>position_code </th> <th>dept_code </th> <th>manager_name </th> <th>sales </th> <th>salary </th> </tr> </table> </body> </html> |
Here, an HTML document is created using <table> tag to display multiple retrieved list data in a table layout. A header part is added when defining <table>, and <style> is specified for each part of the table in <head> part.
When you run this script, the following screen is displayed.
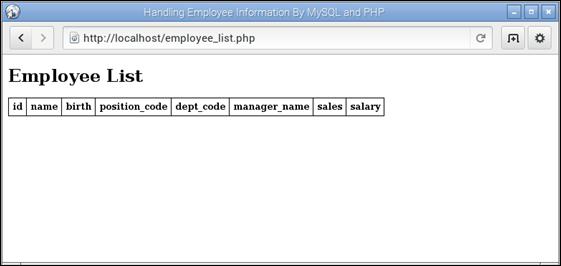
Figure 24‑11 PHP Web example – "Employee List"
● Querying data in database table
Here we use "$mysqli" object created earlier to retrieve the data from the database table.
First read the data from the table. The following SELECT statement is used in SQL statements to read data from the table.
| select * from employee |
The following is querying table data.
| <?php $select_sql = "elect * from employee" ; $result = $mysqli->query ($select_sql); ?> |
Executing "$mysql->query( )" with the above SELECT SQL statement reads and returns data from the specified table, and the data is stored in "$result" object.
● Handling data in table
The next step is to display each retrieved data one by one in a table layout. This should be included within the HTML <table> tag. Read the data in "$result" object one by one, store it in the "$row" object, read the data by one column at a time, and output it using <td> tag.
| <?php while ($row = $result->fetch_assoc()) { print "<tr>" ; print "<td>".$row[ "id" ]."</td>" ; print "<td>".$row[ "name" ]."</td>" ; print "<td>".$row[ "birth" ]."</td>" ; print "<td>".$row[ "position_code" ]."</td>" ; print "<td>".$row[ "dept_code" ]."</td>" ; print "<td>".$row[ "manager_name" ]."</td>" ; print "<td>".$row[ "sales" ]."</td>" ; print "<td>".$row[ "salary" ]."</td>" ; print "</tr>" ; } ?> |
● Combining all script to query data
Below is integrating all the scripts reviewed so far into "employee_list.php".
| <!DOCTYPE html> <html> <head> <title> Handling Employee Information By MySQL and PHP </title> <style> table, th, td { border: 1px solid black; border-collapse: collapse; } th, td { padding: 5px; } </style> </head> <body> <h1>Employee List</h1> //connect database <?php $mysqli = new mysqli('localhost', 'pi', 'xxxxxx', 'raspi_db'); if ($mysqli->connect_error) { die('Connect Error (' . $mysqli->connect_errno . ') '. $mysqli->connect_error); } echo 'Success... ' . $mysqli->host_info . "\n"; ?> <table> <!-- table의 header --> <tr> <th>id </th> <th>name </th> <th>birth </th> <th>position_code </th> <th>dept_code </th> <th>manager_name </th> <th>sales </th> <th>salary </th> </tr> // select data from database table <?php $select_sql = "elect * from employee" ; $result = $mysqli->query ($select_sql); if (!$result) { die('Invalid query: ' . mysql_error()); } printf("Select returned %d rows.\n", $result->num_rows); ?> // table data content <?php while ($row = $result->fetch_assoc()) { print "<tr>" ; print "<td>".$row[ "id" ]."</td>" ; print "<td>".$row[ "name" ]."</td>" ; print "<td>".$row[ "birth" ]."</td>" ; print "<td>".$row[ "position_code" ]."</td>" ; print "<td>".$row[ "dept_code" ]."</td>" ; print "<td>".$row[ "manager_name" ]."</td>" ; print "<td>".$row[ "sales" ]."</td>" ; print "<td>".$row[ "salary" ]."</td>" ; print "</tr>" ; } ?> </table>
<?php $mysqli->close( ) ; ?> </body> </html> |
24.4.12.5 Writing Scrit to Update Database Table Data
Here we will create a script that changes the data in "employee" table of the database.
● Preparing form
Create the basic HMTL as follows and save it in "employee_update.php".
| <!DOCTYPE html> <html> <head> <title> Handling Employee Information By MySQL and PHP </title> </head>
<body> <h1>Employee Detail Update</h1> <form action="employee_update.php" method="POST"> function: <input type="text" name="function" /> <br /><br />
id : <input type="text" name="id" /> <br /> name <input type="text" name="name" /> <br /> birth <input type="text" name="birth" /> <br /> position_code <input type="text" name="position_code" /> <br /> dept_code <input type="text" name="dept_code" /> <br /> manager_name <input type="text" name="manager_name" /> <br /> sales <input type="text" name="sales" /> <br /> salary <input type="text" name="salary" /> <br />
<input type="submit" /> </ form>
</body> </html> |
Here we use <form> tag to define the form required for input. When you define a form, you specify the script file name to "action", and specify the POST method to "method".
The form contains <input> tag in which you can enter data for each column of the database table. Finally, <input> tag of "submit" button is also used to send the form data to the web server.
Inside the form, an <input> tag called "function" is created to input the operation to do in the database with this form. The value specified here will determine the type of changing operation to be processed in the database table:
■ insert -- Insert data in table.
■ update -- Change data in table.
■ delete -- Delete data in table.
When executing the script, the following screen is displayed.
Figure 24‑12 PHP Web example – "Employee Detail Update"
● Modifying table data
When inserting data into a table, use the following form of SQL statement.
| INSERT INTO employee SET name = "John" , birth = "1960-05-17", position_code = "11111", dept_code = "E1000", manager_name = "Mike", sales = "300000", salary = "600000" |
When updating a table data, use the following form of SQL statement.
| update employee SET name = "John" , birth = "1960-05-17" , position_code = "11111" , dept_code = "E1000" , manager_name = "Mike" , sales = "300000" , salary = "600000" where id = 1 ; |
When deleting table data, use the following form of SQL statement.
| delete employee where id = 3 |
Here is a PHP statement that modifies the data in the table. It defines a function for each "insert", "update", and "delete", and performs the necessary processing according to the value of "function" entered in the form.
| // main processing If (isset( $_POST["function"] ) ) { switch ( $_POST["function"] ) { case "insert": employee_insert() ; break; case "update": employee_update() ; break; case "delete": employee_insert() ; break; default: echo "function is incorrect"; } }
// define insert table function function employee_insert () { $update_sql = " INSERT INTO employee "; $update_sql = $update_sql." name = ’".$_POST["name"]."’ , " ; $update_sql = $update_sql." birth = ’".$_POST["birth"]."’ , " ; $update_sql = $update_sql." position_code = ’".$_POST["position_code"]."’ , " ; $update_sql = $update_sql." dept_code = ’".$_POST["dept_code"]."’ , " ; $update_sql = $update_sql." manager_name = ’".$_POST["manager_name"]."’ , " ; $update_sql = $update_sql." sales = ’".$_POST["sales"]."’ , " ; $update_sql = $update_sql." salary = ’".$_POST["salary"]."’ " ;
if ($mysqli->query($update_sql) === TRUE) { echo "insert successfully"; } else { echo "insert error: " . $conn->error; } }
// define update table function function employee_update () { $update_sql = "DELETE employee SET "; $update_sql = $update_sql." name = ’".$_POST["name"]."’ , " ; $update_sql = $update_sql." birth = ’".$_POST["birth"]."’ , " ; $update_sql = $update_sql." position_code = ’".$_POST["position_code"]."’ , " ; $update_sql = $update_sql." dept_code = ’".$_POST["dept_code"]."’ , " ; $update_sql = $update_sql." manager_name = ’".$_POST["manager_name"]."’ , " ; $update_sql = $update_sql." sales = ’".$_POST["sales"]."’ , " ; $update_sql = $update_sql." salary = ’".$_POST["salary"]."’ , " ; $update_sql = $update_sql." WHERE id = ’".$_POST["id"]."’ " ;
if ($mysqli->query($update_sql) === TRUE) { echo "update successfully"; } else { echo "update error: " . $conn->error; } }
// define delete table function function employee_delete () { $update_sql = "DELETE employee "; $update_sql = $update_sql." WHERE id = ’".$_POST["id"]."’ " ;
if ($mysqli->query($update_sql) === TRUE) { echo "delete successfully"; } else { echo "delete error : " . $conn->error; } } |
● Combinig all scripts to modify table data
Below is combining all the scripts reviewed so far into "employee_update.php" file.
| <!DOCTYPE html> <html> <head> <title> Handling Employee Information By MySQL and PHP </title> </head> <body> <h1>Employee Detail Update</h1>
<?php $mysqli = new mysqli('localhost', 'pi', 'xxxxxx', 'raspi_db'); if ($mysqli->connect_error) { die('Connect Error (' . $mysqli->connect_errno. ') '. $mysqli->connect_error); } echo 'Success... ' . $mysqli->host_info . "\n"; ?>
<form action="employee_update.php" method="POST"> function: <input type="text" name="function" /> <br /> <br /> id : <input type="text" name="id" /> <br /> name <input type="text" name="name" /> <br /> birth <input type="text" name="birth" /> <br /> position_code <input type="text" name="position_code" /> <br /> dept_code <input type="text" name="dept_code" /> <br /> manager_name <input type="text" name="manager_name" /> <br /> sales <input type="text" name="sales" /> <br /> salary <input type="text" name="salary" /> <br /> <input type="submit" /> </ form>
// main processing If (isset( $_POST["function"] ) ) { switch ( $_POST["function"] ) { case "insert": employee_insert() ; break; case "update": employee_update() ; break; case "delete": employee_insert() ; break; default: echo "function is incorrect"; } }
// close database connection <?php $mysqli->close( ) ; ?>
// define insert table function function employee_insert () { $update_sql = " INSERT INTO employee "; $update_sql = $update_sql." name = '".$_POST["name"]."' , " ; $update_sql = $update_sql." birth = '".$_POST["birth"]."' , " ; $update_sql = $update_sql." position_code = '".$_POST["position_code"]."' , " ; $update_sql = $update_sql." dept_code = '".$_POST["dept_code"]."' , " ; $update_sql = $update_sql." manager_name = '".$_POST["manager_name"]."' , " ; $update_sql = $update_sql." sales = '".$_POST["sales"]."' , " ; $update_sql = $update_sql." salary = '".$_POST["salary"]."' " ;
if ($mysqli->query($update_sql) === TRUE) { echo "insert successfully"; } else { echo "insert error: " . $conn->error; } }
// define update table function function employee_update () { $update_sql = "DELETE employee SET "; $update_sql = $update_sql." name = '".$_POST["name"]."' , " ; $update_sql = $update_sql." birth = '".$_POST["birth"]."' , " ; $update_sql = $update_sql." position_code = '".$_POST["position_code"]."' , " ; $update_sql = $update_sql." dept_code = '".$_POST["dept_code"]."' , " ; $update_sql = $update_sql." manager_name = '".$_POST["manager_name"]."' , " ; $update_sql = $update_sql." sales = '".$_POST["sales"]."' , " ; $update_sql = $update_sql." salary = '".$_POST["salary"]."' , " ; $update_sql = $update_sql." WHERE id = '".$_POST["id"]."' " ;
if ($mysqli->query($update_sql) === TRUE) { echo "update successfully"; } else { echo "update error: " . $conn->error; } }
// define delete table function function employee_delete () { $update_sql = "DELETE employee "; $update_sql = $update_sql." WHERE id = '".$_POST["id"]."' " ;
if ($mysqli->query($update_sql) === TRUE) { echo "delete successfully"; } else { echo "delete error : " . $conn->error; } }
</body> </html> |
24.4.12.6 Flow of Managing Screen for Table "employee"