Published Book on Amazon
| All of IOT Starting with the Latest Raspberry Pi from Beginner to Advanced – Volume 1 | |
| All of IOT Starting with the Latest Raspberry Pi from Beginner to Advanced – Volume 2 |
출판된 한글판 도서
| 최신 라즈베리파이(Raspberry Pi)로 시작하는 사물인터넷(IOT)의 모든 것 – 초보에서 고급까지 (상) | |
| 최신 라즈베리파이(Raspberry Pi)로 시작하는 사물인터넷(IOT)의 모든 것 – 초보에서 고급까지 (하) |
Original Book Contents
18.4.2 Remote Drive Connection Using SCP Program
SCP (Secure Copy) is a program that sends and receives files to and from a remote computer using SFTP or SCP protocol through SSH.
18.4.2.1 Installing/Enabling SSH server Program
This program basically assumes that SSH server of the remote computer is running. To do this, you must first enable the SSH server in the Raspberry Pi system. For details, see the description of [9.9.1 Enabling SSH].
18.4.2.2 Connecting from SCP Client
● File transfer using <WinSCP> program in MS Windows
There are various programs that support SCP such as <PSCP> and <WinSCP>. We want to use <WinSCP> program, which is a typical program in MS Windows.
The <WinSCP> program is a free open source program that can be used as SFTP client, FTP client, WebDAV client, or SCP client in MS Windows. The <WinSCP> program can be downloaded from the following:
■ http://winscp.net/eng/download.php
After downloading the program, install the program in MS Windows. When the installation is complete, run the program.
When you run the program, you will see the screen to set the following connection parameters. Specify the required items and save them, and then execute the [Login] button. This program uses SSH, so this use default port "22".
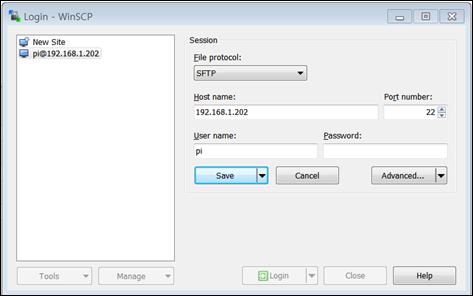
Figure 18‑8 <WinSCP> client
When you connect to Raspberry Pi system for the first time, a security warning screen appears as shown below. you choose the appropriate one and proceed to the next. It will appear only at the beginning and not at the next. When the selection is completed, a screen for entering the password for the designated user is displayed. Enter the appropriate password and continue.
Then the data of the client system appears on the left side and the data of the Raspberry Pi system on the right side as shown below. You can copy data by dragging and dropping the desired files or folders on the screen. With this program, you can move the desired data in both directions.
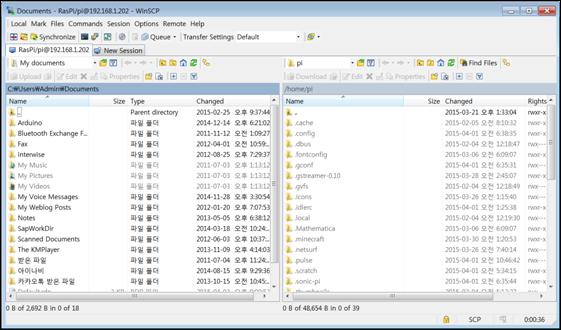
Figure 18‑9 Remote drive connection using <WinSCP>
● File transfer in Linux or Mac
Most Linux and Mac operating systems include the SCP program by default, but on some Linux systems it is not included by default. Because the SCP program is installed by default on the Raspberry Pi system, it does not require any special installation.
Install the program on a system that does not have SCP installed.
| sudo apt-get install scp |
|
|
To connect to the remote system and transfer file to each other, execute the command in the following format.
[Command Format]
| scp [option] [[user@]from-host:]from-filepath [[user@]to-host:]to-filepath |
[Command Overview]
■ This transfer file from one from-host system to another to-host system.
■ User privilege -- Normal user.
[Detail Description]
■ In the above command, if a specific host is a local host, the user who executes this command has already logged on to the host as a specific user, so you can specify only the file path without specifying user in the command.
■ This command basically copies the data from "from-host" to the "to-host", so if you need to copy in the opposite direction, you need to execute a separate command.
[Used Example]
The following is an example of transferring file data from another Raspberry Pi system into a specific Raspberry Pi system. When the command is executed, the first step is to check whether the communication with the remote system is connected or not to check whether there are any security problems. This check is only done at the first time you connect, and not at the next connection. Then, after the process of entering the user's password to logon to the remote system, the specified file is transferred. After the command is completed, it can be confirmed that the file is transferred.
| pi@raspberrypi3:~ $ ls /home/pi/Videos |
|
|
| pi@raspberrypi3:~ $ scp pi@192.168.1.203:/home/pi/Videos/test1.jpg /home/pi/Videos |
| The authenticity of host '192.168.1.203 (192.168.1.203)' can't be established. ECDSA key fingerprint is c9:85:5d:1f:8a:10:6a:d3:47:a2:9f:f2:a4:6e:9a:2e. Are you sure you want to continue connecting (yes/no)? yes Warning: Permanently added '192.168.1.203' (ECDSA) to the list of known hosts. pi@192.168.1.203's password: test1.jpg 100% 2854KB 951.3KB/s 00:03 |
| pi@raspberrypi3:~ $ ls /home/pi/Videos |
| test1.jpg |