Published Book on Amazon
| All of IOT Starting with the Latest Raspberry Pi from Beginner to Advanced – Volume 1 | |
| All of IOT Starting with the Latest Raspberry Pi from Beginner to Advanced – Volume 2 |
출판된 한글판 도서
| 최신 라즈베리파이(Raspberry Pi)로 시작하는 사물인터넷(IOT)의 모든 것 – 초보에서 고급까지 (상) | |
| 최신 라즈베리파이(Raspberry Pi)로 시작하는 사물인터넷(IOT)의 모든 것 – 초보에서 고급까지 (하) |
Original Book Contents
24.4.12 간단한 PHP Web 페이지
우리는 여기서 PHP를 이용해서 MySQL에 있는 자료를 조회, 입력, 수정, 삭제하는 작업을 해 볼 것이다.
24.4.12.1 Main 문서의 준비
다음과 같은 문서를 작성하고 "index.php" 파일에 저장한다.
| <!DOCTYPE html> <html> <head> <title> Handling Employee Information By MySQL and PHP </title> </head> <body> <p><a href=" /employee_list.php"> Employee List </a></p> <p><a href="/employee_update.php"> Employee Detail Update</a></p> </body> </html> |
위 문서에서는 "Employee List" 문구에 대해서 "/employee_list.php" script 파일이 연결되어 있고, "Employee Detail Update" 문구에 대해서 "/employee_update.php" script 파일이 연결되어 있다.
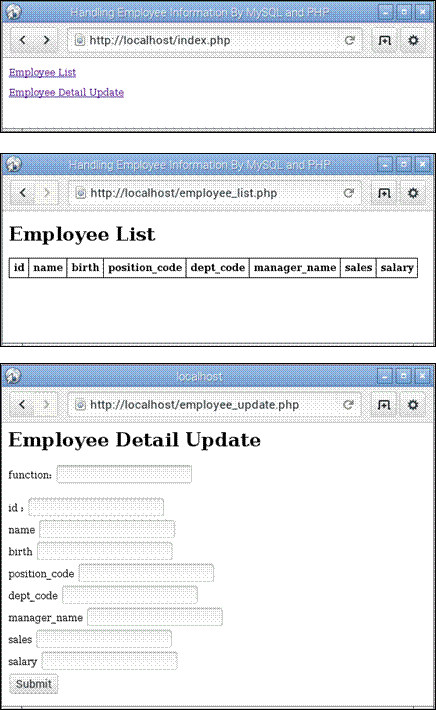
이 파일을 web browser를 통해서 실행하면 다음과 같은 화면이 나타난다.
|
|
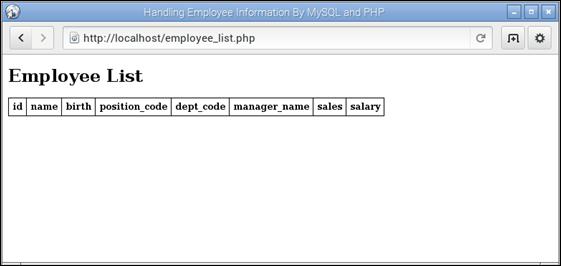
그림 24‑10 PHP Web 사례- main 문서의 시작화면
이것은 앞으로 처리할 작업에 대한 main 시작화면을 위한 문서이다. 여기서 화면에서 "Employee List"를 클릭하면 database의 "employee" table에서 자료를 조회하는 web page로 진행하게 될 것이고, "Employee Detail Update"를 클릭하면 database의 "employee" table의 자료를 변경하는 web page 화면으로 진행하게 될 것이다.
24.4.12.2 database 및 table 준비 작업
여기서 사용하는 database는 앞에서 MySQL을 설명할 때 사용했던 database와 table을 이용할 것이다. 구체적인 내용은 다음과 같다.
■ database -- raspi_db
■ table -- employee
■ id -- INT -- PRIMARY KEY, AUTO_INCREMENT
■ name -- VARCHAR(50)
■ birth -- DATE
■ position_code -- CHAR(10)
■ dept_code -- CHAR(10)
■ manager_name -- VARCHAR(50)
■ sales -- DECIMAL(10,0)
■ salary_rate -- NUMERIC(6,2)
24.4.12.3 database 연결과 종료
● database 연결
여기서는 <mysqli> extension을 사용하여 database에 접속할 것이다. database 연결에 필요한 정보는 다음과 같다.
■ host name -- localhost
여기에는 IP address나 host에 대한 URL을 지정할 수 있는데, 여기서는 MySQL이 동일한 server에 설치되어 있으므로 "localhost"를 사용하였다.
■ user -- pi
■ password -- xxxxxx
■ database -- raspi_db
먼저 아래와 같이 mysqli object를 생성하여 MySQL database에 연결하도록 한다.
| <?php $mysqli = new mysqli('localhost', 'pi', 'xxxxxx', 'raspi_db');
echo 'Success... ' . $mysqli->host_info . "\n";
?> |
여기서는 "mysqli" object를 생성하여 "$mysqli" 변수에 저장한다. object가 생성되면서 내부적으로 MySQL database에 대한 연결을 시도하게 되고, 연결이 정상적으로 완료되면, connection과 관련된 모든 정보가 "$mysqli" 변수에 저장된다. "$mysqli" 변수에 저장된 object는 차후 MySQL과의 모든 작업을 처리해 준다.
● database 연결 종료
database에 대한 모든 처리가 종료되면, 해당 database에 대한 연결을 종료시킨다. 다음과 같이 처리할 수 있다.
| <?php $mysqli->close( ) ; ?> |
24.4.12.4 database table 자료를 조회하는 script 작성
여기서는 database의 employee table에 있는 자료를 조회하는 script를 작성하도록 한다.
● 기본 HTML 및 table layout 작성
다음과 같은 HMTL내용을 가지는 PHP 파일을 만들고 "employee_list.php"에 저장한다.
| <!DOCTYPE html> <html> <head> <title> Handling Employee Information By MySQL and PHP </title> <style> table, th, td { border: 1px solid black; border-collapse: collapse; } th, td { padding: 5px; } </style> </head>
<body> <h1>Employee List</h1> <table> <!-- table의 header --> <tr> <th>id </th> <th>name </th> <th>birth </th> <th>position_code </th> <th>dept_code </th> <th>manager_name </th> <th>sales </th> <th>salary </th> </tr> </table> </body> </html> |
여기서는 조회된 여러 개의 목록자료를 table layout으로 표시해 주기 위해 <table> tag를 이용하여 HTML문서를 만들고 있다. <table>을 정의할 때 header 부분이 추가되어 있고, <head> 부분에서 table의 각 부분에 대해서 <style>이 지정되어 있다.
이 script를 실행해 보면 아래와 같은 화면이 표시된다.
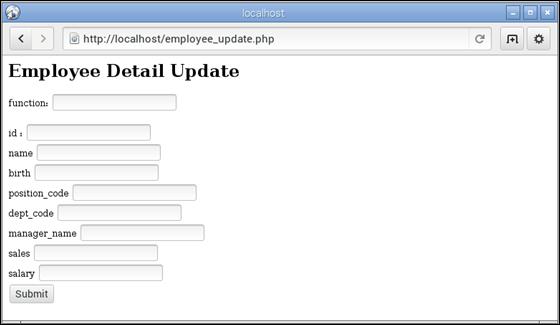
그림 24‑11 PHP Web 사례- "Employee List"
● database table 자료 조회
여기서는 앞에서 생성된 "$mysqli" object를 이용하여 database table에서 자료를 조회하는 작업을 한다.
먼저 table에서 자료를 읽는다. table에서 자료를 읽기 위한 SQL 문에는 다음과 같은 SELECT 문을 사용한다.
| select * from employee |
다음은 table에서 자료를 조회하는 작업이다.
| <?php $select_sql = "elect * from employee" ; $result = $mysqli->query ($select_sql); ?> |
위와 같은 SELECT SQL문장을 이용하여 "$mysql->query( )"를 실행하면 지정된 table에서 자료를 읽어서 되돌려주고, 그 자료가 "$result" object에 저장된다.
● table 자료 처리
다음은 조회한 자료를 하나씩 table layout으로 출력하는 것이다. 이 부분은 HTML <table> tag 내부에 들어가야 할 부분이다. "$result" object에 있는 자료를 하나씩 읽어서 "$row" object에 저장한 다음, 한 column씩 자료를 읽어서 <td> tag를 이용하여 출력한다.
| <?php while ($row = $result->fetch_assoc()) { print "<tr>" ; print "<td>".$row[ "id" ]."</td>" ; print "<td>".$row[ "name" ]."</td>" ; print "<td>".$row[ "birth" ]."</td>" ; print "<td>".$row[ "position_code" ]."</td>" ; print "<td>".$row[ "dept_code" ]."</td>" ; print "<td>".$row[ "manager_name" ]."</td>" ; print "<td>".$row[ "sales" ]."</td>" ; print "<td>".$row[ "salary" ]."</td>" ; print "</tr>" ; } ?> |
● 자료 조회 script 종합
아래는 지금까지 검토한 모든 script 들을 "employee_list.php"에 하나로 통합한 것이다.
| <!DOCTYPE html> <html> <head> <title> Handling Employee Information By MySQL and PHP </title> <style> table, th, td { border: 1px solid black; border-collapse: collapse; } th, td { padding: 5px; } </style> </head> <body> <h1>Employee List</h1> //connect database <?php $mysqli = new mysqli('localhost', 'pi', 'xxxxxx', 'raspi_db'); if ($mysqli->connect_error) { die('Connect Error (' . $mysqli->connect_errno . ') '. $mysqli->connect_error); } echo 'Success... ' . $mysqli->host_info . "\n"; ?> <table> <!-- table의 header --> <tr> <th>id </th> <th>name </th> <th>birth </th> <th>position_code </th> <th>dept_code </th> <th>manager_name </th> <th>sales </th> <th>salary </th> </tr> // select data from database table <?php $select_sql = "elect * from employee" ; $result = $mysqli->query ($select_sql); if (!$result) { die('Invalid query: ' . mysql_error()); } printf("Select returned %d rows.\n", $result->num_rows); ?> // table data content <?php while ($row = $result->fetch_assoc()) { print "<tr>" ; print "<td>".$row[ "id" ]."</td>" ; print "<td>".$row[ "name" ]."</td>" ; print "<td>".$row[ "birth" ]."</td>" ; print "<td>".$row[ "position_code" ]."</td>" ; print "<td>".$row[ "dept_code" ]."</td>" ; print "<td>".$row[ "manager_name" ]."</td>" ; print "<td>".$row[ "sales" ]."</td>" ; print "<td>".$row[ "salary" ]."</td>" ; print "</tr>" ; } ?> </table>
<?php $mysqli->close( ) ; ?> </body> </html> |
24.4.12.5 database table 자료 수정 script 작성
여기서는 database의 "employee" table에 있는 자료를 변경하는 script를 작성하도록 한다.
● form 준비
다음과 같은 기본적인 HMTL을 작성하여 "employee_update.php"에 저장한다.
| <!DOCTYPE html> <html> <head> <title> Handling Employee Information By MySQL and PHP </title> </head>
<body> <h1>Employee Detail Update</h1> <form action="employee_update.php" method="POST"> function: <input type="text" name="function" /> <br /><br />
id : <input type="text" name="id" /> <br /> name <input type="text" name="name" /> <br /> birth <input type="text" name="birth" /> <br /> position_code <input type="text" name="position_code" /> <br /> dept_code <input type="text" name="dept_code" /> <br /> manager_name <input type="text" name="manager_name" /> <br /> sales <input type="text" name="sales" /> <br /> salary <input type="text" name="salary" /> <br />
<input type="submit" /> </ form>
</body> </html> |
여기서는 <form> tag를 이용하여 입력에 필요한 양식을 정의한다. form을 정의할 때 "action"에는 해당 script 파일 이름을 그대로 지정하고, "method"에는 POST 방식을 지정하고 있다.
form에는 database table의 각 column에 대해서 자료를 입력할 수 있는 <input> tag가 포함되어 있다. 마지막에는 form 자료를 web server로 전송하는데 사용되는 "submit" button <input> tag도 정의하고 있다.
form의 내부에는 이 form으로 database에서 할 작업을 입력받기 위해서 "function"이라는 <input> tag가 만들어져 있다. 여기서 지정한 값에 따라 database table에서 처리할 변경 작업의 종류가 다음과 같이 결정될 것이다.
■ insert -- table에 자료를 추가한다.
■ update -- table에 자료를 수정한다.
■ delete -- table에 자료를 삭제한다.
해당 script를 실행하면 다음과 같은 화면이 표시된다.

그림 24‑12 PHP Web 사례- "Employee Detail Update"
● table update 처리
table자료를 insert 할 때 다음과 같은 형식의 SQL 문장을 사용한다.
| INSERT INTO employee SET name = "John" , birth = "1960-05-17", position_code = "11111", dept_code = "E1000", manager_name = "Mike", sales = "300000", salary = "600000" |
table을 update할 때 다음과 같은 형식의 SQL 문장을 사용한다.
| update employee SET name = "John" , birth = "1960-05-17" , position_code = "11111" , dept_code = "E1000" , manager_name = "Mike" , sales = "300000" , salary = "600000" where id = 1 ; |
table자료를 삭제할 때 다음과 같은 형식의 SQL 문장을 사용한다.
| delete employee where id = 3 |
다음은 table에 있는 자료를 수정하는 PHP 문장이다. "insert", "update", "delete" 각각에 대해서 함수를 정의하고, form에서 입력한 "function" 값에 따라서 필요한 처리를 하도록 하였다.
| // main processing If (isset( $_POST["function"] ) ) { switch ( $_POST["function"] ) { case "insert": employee_insert() ; break; case "update": employee_update() ; break; case "delete": employee_insert() ; break; default: echo "function is incorrect"; } }
// define insert table function function employee_insert () { $update_sql = " INSERT INTO employee "; $update_sql = $update_sql." name = ’".$_POST["name"]."’ , " ; $update_sql = $update_sql." birth = ’".$_POST["birth"]."’ , " ; $update_sql = $update_sql." position_code = ’".$_POST["position_code"]."’ , " ; $update_sql = $update_sql." dept_code = ’".$_POST["dept_code"]."’ , " ; $update_sql = $update_sql." manager_name = ’".$_POST["manager_name"]."’ , " ; $update_sql = $update_sql." sales = ’".$_POST["sales"]."’ , " ; $update_sql = $update_sql." salary = ’".$_POST["salary"]."’ " ;
if ($mysqli->query($update_sql) === TRUE) { echo "insert successfully"; } else { echo "insert error: " . $conn->error; } }
// define update table function function employee_update () { $update_sql = "DELETE employee SET "; $update_sql = $update_sql." name = ’".$_POST["name"]."’ , " ; $update_sql = $update_sql." birth = ’".$_POST["birth"]."’ , " ; $update_sql = $update_sql." position_code = ’".$_POST["position_code"]."’ , " ; $update_sql = $update_sql." dept_code = ’".$_POST["dept_code"]."’ , " ; $update_sql = $update_sql." manager_name = ’".$_POST["manager_name"]."’ , " ; $update_sql = $update_sql." sales = ’".$_POST["sales"]."’ , " ; $update_sql = $update_sql." salary = ’".$_POST["salary"]."’ , " ; $update_sql = $update_sql." WHERE id = ’".$_POST["id"]."’ " ;
if ($mysqli->query($update_sql) === TRUE) { echo "update successfully"; } else { echo "update error: " . $conn->error; } }
// define delete table function function employee_delete () { $update_sql = "DELETE employee "; $update_sql = $update_sql." WHERE id = ’".$_POST["id"]."’ " ;
if ($mysqli->query($update_sql) === TRUE) { echo "delete successfully"; } else { echo "delete error : " . $conn->error; } } |
● table 자료 변경 script 종합
아래는 지금까지 검토한 모든 script들을 "employee_update.php"에 하나로 통합한 것이다.
| <!DOCTYPE html> <html> <head> <title> Handling Employee Information By MySQL and PHP </title> </head> <body> <h1>Employee Detail Update</h1>
<?php $mysqli = new mysqli('localhost', 'pi', 'xxxxxx', 'raspi_db'); if ($mysqli->connect_error) { die('Connect Error (' . $mysqli->connect_errno. ') '. $mysqli->connect_error); } echo 'Success... ' . $mysqli->host_info . "\n"; ?>
<form action="employee_update.php" method="POST"> function: <input type="text" name="function" /> <br /> <br /> id : <input type="text" name="id" /> <br /> name <input type="text" name="name" /> <br /> birth <input type="text" name="birth" /> <br /> position_code <input type="text" name="position_code" /> <br /> dept_code <input type="text" name="dept_code" /> <br /> manager_name <input type="text" name="manager_name" /> <br /> sales <input type="text" name="sales" /> <br /> salary <input type="text" name="salary" /> <br /> <input type="submit" /> </ form>
// main processing If (isset( $_POST["function"] ) ) { switch ( $_POST["function"] ) { case "insert": employee_insert() ; break; case "update": employee_update() ; break; case "delete": employee_insert() ; break; default: echo "function is incorrect"; } }
// close database connection <?php $mysqli->close( ) ; ?>
// define insert table function function employee_insert () { $update_sql = " INSERT INTO employee "; $update_sql = $update_sql." name = '".$_POST["name"]."' , " ; $update_sql = $update_sql." birth = '".$_POST["birth"]."' , " ; $update_sql = $update_sql." position_code = '".$_POST["position_code"]."' , " ; $update_sql = $update_sql." dept_code = '".$_POST["dept_code"]."' , " ; $update_sql = $update_sql." manager_name = '".$_POST["manager_name"]."' , " ; $update_sql = $update_sql." sales = '".$_POST["sales"]."' , " ; $update_sql = $update_sql." salary = '".$_POST["salary"]."' " ;
if ($mysqli->query($update_sql) === TRUE) { echo "insert successfully"; } else { echo "insert error: " . $conn->error; } }
// define update table function function employee_update () { $update_sql = "DELETE employee SET "; $update_sql = $update_sql." name = '".$_POST["name"]."' , " ; $update_sql = $update_sql." birth = '".$_POST["birth"]."' , " ; $update_sql = $update_sql." position_code = '".$_POST["position_code"]."' , " ; $update_sql = $update_sql." dept_code = '".$_POST["dept_code"]."' , " ; $update_sql = $update_sql." manager_name = '".$_POST["manager_name"]."' , " ; $update_sql = $update_sql." sales = '".$_POST["sales"]."' , " ; $update_sql = $update_sql." salary = '".$_POST["salary"]."' , " ; $update_sql = $update_sql." WHERE id = '".$_POST["id"]."' " ;
if ($mysqli->query($update_sql) === TRUE) { echo "update successfully"; } else { echo "update error: " . $conn->error; } }
// define delete table function function employee_delete () { $update_sql = "DELETE employee "; $update_sql = $update_sql." WHERE id = '".$_POST["id"]."' " ;
if ($mysqli->query($update_sql) === TRUE) { echo "delete successfully"; } else { echo "delete error : " . $conn->error; } }
</body> </html> |
24.4.12.6 database table "employee" 관리 화면 진행 흐름