Published Book on Amazon
| All of IOT Starting with the Latest Raspberry Pi from Beginner to Advanced – Volume 1 | |
| All of IOT Starting with the Latest Raspberry Pi from Beginner to Advanced – Volume 2 |
출판된 한글판 도서
| 최신 라즈베리파이(Raspberry Pi)로 시작하는 사물인터넷(IOT)의 모든 것 – 초보에서 고급까지 (상) | |
| 최신 라즈베리파이(Raspberry Pi)로 시작하는 사물인터넷(IOT)의 모든 것 – 초보에서 고급까지 (하) |
Original Book Contents
24.2.2 Installing <MySQL Server>
24.2.2.1 Installing <MySQL Server>
To install <MySQL Server> on Raspberry Pi, use the following command:
| sudo apt-get install mysql-server |
When the command is executed, the screen to enter password for "root" account will appear as shown below.
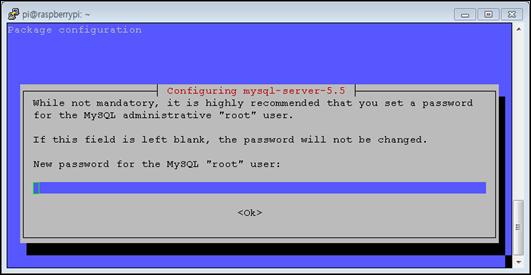
Figure 24‑1 "root" account in installing <MySQL Server>
If you enter the password here and press [OK], it displays the password confirmation screen again. If you enter the same password as the previously entered password and press [OK] button, it resumes the installation.
"root" account used to enter password during installation is used as MySQL administrator. The account is used only in MySQL and is different from "root" account used as the system administrator of Raspberry Pi.
24.2.2.2 Configuring <MySQL Server>
After <MySQL Server> installation is complete, you need to make the necessary settings to adjust <MySQL Server> settings. Configuration information for <MySQL Server> is stored in "/etc/mysql/my.cnf" file. Below is an excerpt of important information.
| # # The MySQL database server configuration file. # # You can copy this to one of: # - "/etc/mysql/my.cnf" to set global options, # - "~/.my.cnf" to set user-specific options. ~ Skip ~ Skip [client] port = 3306 socket = /var/run/mysqld/mysqld.sock ~ Skip ~ Skip # This was formally known as [safe_mysqld]. Both versions are currently parsed. [mysqld_safe] socket = /var/run/mysqld/mysqld.sock nice = 0
[mysqld] # # * Basic Settings # user = mysql pid-file = /var/run/mysqld/mysqld.pid socket = /var/run/mysqld/mysqld.sock port = 3306 basedir = /usr datadir = /var/lib/mysql tmpdir = /tmp lc-messages-dir = /usr/share/mysql ~ Skip ~ Skip [mysqldump] quick quote-names max_allowed_packet = 16M
[mysql] #no-auto-rehash # faster start of mysql but no tab completition ~ Skip ~ Skip # # * IMPORTANT: Additional settings that can override those from this file! # The files must end with '.cnf', otherwise they'll be ignored. # !includedir /etc/mysql/conf.d/ |
Once the basic <MySQL Server> installation is complete, you will need to perform the following additional configuration tasks. First, let MySQL create a database directory structure to hold information about the database. Use the following command.
| sudo mysql_install_db |
Next, run a simple security script as follows to remove some dangerous default settings and to block unauthorized access to the database system for enhancing the security of the database.
| sudo mysql_secure_installation |
When you run this command, there is a procedure to confirm the current password for MySQL "root" account. This command checks whether the following items are processed. Most of them are needed for reference in the development process, but are not needed in the actual operating environment.
■ Change the root password? [Y/n]
■ Remove anonymous users? [Y/n]
■ Disallow root login remotely? [Y/n]
■ Remove test database and access to it? [Y/n]
■ Reload privilege tables now? [Y/n]
When you have finished configuring MySQL, you restart the application for MySQL to be executed with the new configuration reflected immediately. Run the following command.
| sudo service mysql restart |